
Getting your product shots right really comes down to three things: clean lighting, a simple background, and sharp focus. If you can nail these fundamentals, you can create professional-looking images with just your smartphone and a window. It’s never been about having the most expensive gear; it’s about controlling the environment to make your product the star of the show.
Building Your Foundation for Great Product Photos
Before you even think about hitting that shutter button, it's worth taking a step back to understand why high-quality images are such a big deal. Great product photography isn’t just about showing off what you sell. It's about building trust and creating a direct line to your customer's wallet. Think about it—a blurry, poorly lit photo screams "amateur," which can make shoppers question the quality of the product itself.
On the flip side, a sharp, well-lit, and thoughtfully styled image communicates professionalism. It helps the customer picture the product in their own life, answering questions about size, texture, and feel without them having to read a single line of description. This visual storytelling is what separates the brands that thrive from those that just get by.
Why Professional Imagery Drives Sales
The link between image quality and sales isn't just a hunch; it's a proven driver of e-commerce success. A massive 75% of online shoppers say that product photos are a make-or-break factor in their buying decisions. A crystal-clear photo can be the final nudge a customer needs to click "add to cart." In fact, products showcased with professional-level photography can see a 33% higher conversion rate than items with subpar shots. If you want to dive deeper, you can learn more about the impact of photography on e-commerce trends and see how the top brands are crushing it.
This infographic really puts it into perspective, showing how professional shots directly influence key e-commerce metrics.
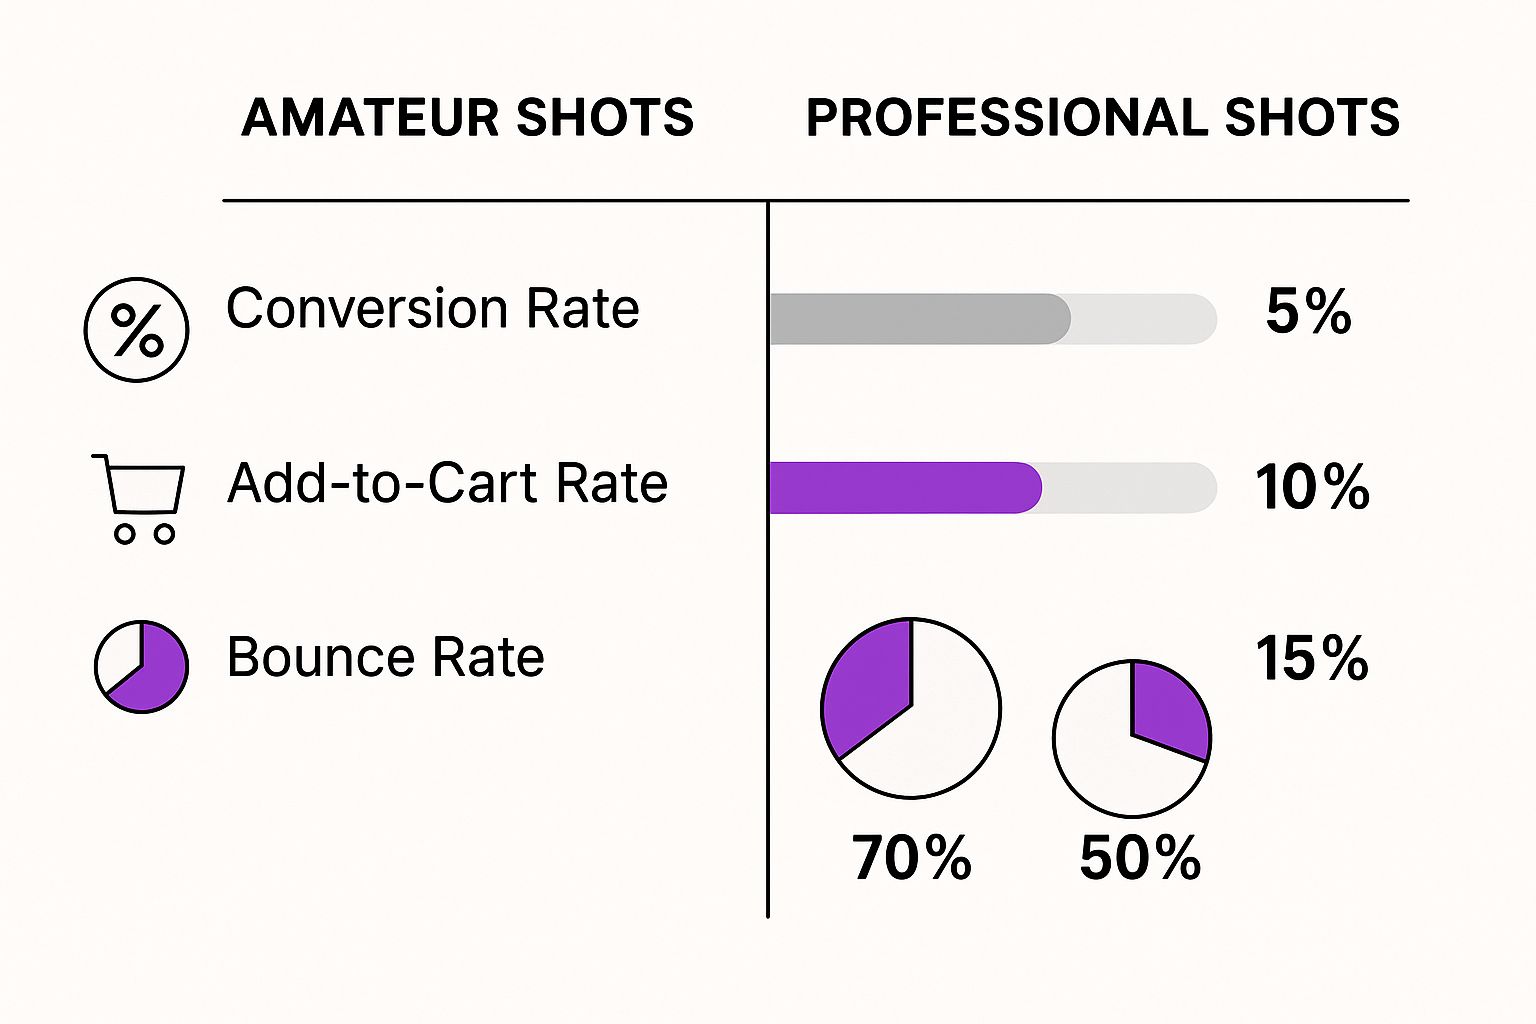
The numbers don't lie. Investing time and a little effort into your photos pays off in customer engagement and, most importantly, revenue.
The Core Pillars of Effective Product Shots
So, how do you start creating these high-impact images? It all comes back to a few core principles that anyone can master, no matter the budget or equipment. You absolutely do not need a thousand-dollar camera to get this right.
Just focus your energy on these three areas:
- Controlling Your Light: Whether you're using sunlight from a window or a simple desk lamp, the goal is always soft, even light. You want to minimize harsh shadows and highlight your product's best features, not wash them out.
- Creating a Clean Background: A cluttered or distracting background pulls focus away from what you’re trying to sell. A simple white poster board, a clean roll of paper, or even a neutral-colored wall is often all you need.
- Telling a Simple Story: Your composition and styling are what help customers connect with your product. Adding a simple, relevant prop can show scale or suggest how the item is used, making it instantly more relatable.
Your camera doesn't determine the quality of your photo. Your control over light, background, and composition does. A well-executed shot with an iPhone will always outperform a sloppy one taken with a professional DSLR.
By focusing on these foundational elements, you're not just taking pictures—you're creating a powerful sales tool. This approach ensures every single image you produce is built on a solid strategy designed to turn casual browsers into loyal buyers.
Mastering Light to Make Your Products Shine
Let's be honest: light isn't just a part of product photography; it's the main ingredient. The way light falls across your product defines its texture, brings out its shape, and sets the entire mood. It's what makes a customer stop scrolling.
The good news? You don't need a fancy studio to get this right. The real secret to taking great product shots is learning to master the light you already have. Once you can shape and control it, you can turn flat, boring images into visuals that look polished, professional, and ready to sell.
Harnessing Natural Window Light
Your best and cheapest light source is probably a large window on a slightly overcast day. This gives you a gorgeous, soft, diffused light that wraps around your product, minimizing harsh shadows. It's the perfect look for clean, flattering e-commerce shots.
To get started, set up your product on a table next to a window, but make sure it’s out of direct sunlight. Direct sun is your enemy here—it creates deep, distracting shadows and bright spots (called "blown-out highlights") that wash out important details. You're after that soft, indirect glow.
You'll probably notice one side of your product is bright while the other is in shadow. This is where a simple trick makes a huge difference. Grab a piece of white foam board or even just a sheet of white paper and prop it up on the shadowy side. This acts as a reflector, bouncing light back into the dark areas and creating a much more balanced look.
Key Takeaway: Good lighting is all about balance. Always use a reflector to "fill" the shadows created by your main light source. This one move instantly makes your photos look more professional by evening out the light and showing off more of your product.
Creating a Simple Artificial Light Setup
What if window light isn't an option? No problem. You can easily mimic a professional setup with one or two lamps you already own. The most important thing is to soften the light so you don't get that harsh glare from a bare bulb.
For a simple one-light setup, place a lamp at about a 45-degree angle to your product. To soften it, you can either shine it through a thin white bedsheet or bounce it off a white wall or ceiling. This diffusion process scatters the light, giving you that same soft quality you get from an overcast window.
If you have two lights, you can create an even more polished look.
- Key Light: This is your main, brightest light. Place it at a 45-degree angle to one side of the product.
- Fill Light: This is your second, less powerful light (or just place it further away). Position it on the opposite side to soften the shadows created by your key light.
This classic two-point lighting setup is a go-to for a reason. It provides fantastic coverage, ensuring your product is evenly lit and all its best features are clearly visible.
Understanding Hard Light vs. Soft Light
The quality of light creates different types of shadows, and this has a massive impact on the mood of your photo.
For example, a textured leather wallet might look amazing with hard light to really show off the grain. On the other hand, a chrome kettle would look best in soft light to minimize distracting reflections and create a clean, sleek appearance. The best way to learn is to experiment with both and see what works for your specific product and brand.
Styling and Composition to Tell a Story

A great product shot does more than just show off an item; it invites the customer to imagine that product in their own life. This is where styling and composition come in, turning a simple picture into a compelling narrative. It's the difference between showing a mug and selling the feeling of a cozy morning.
Once you've moved past the basic camera settings, the real work begins: crafting a scene that clicks with your target audience. A clean, seamless white background is a classic for a reason—it’s perfect for distraction-free e-commerce listings. But a lifestyle setting? That adds context, personality, and helps your product tell its story.
Choosing Backgrounds That Align With Your Brand
Think of your background as the stage for your product. The right choice reinforces your brand’s identity and speaks directly to your ideal customer. A sleek, dark slate background might be perfect for a luxury watch, while a warm, rustic wood surface beautifully complements handmade ceramics.
Here are a few options to get you started:
- Seamless Paper: This is the industry standard for a clean, professional look. It creates an "infinity sweep" that gets rid of distracting corners and keeps all the focus right where it should be—on your product.
- Textured Surfaces: Materials like linen, marble tiles, or wooden boards can add a tactile quality and mood to your photos, making them feel more tangible.
- Lifestyle Environments: Shooting in a real or staged environment (like a kitchen or living room) shows the product in its natural habitat. This makes it far more relatable.
Your background isn't just a backdrop; it's a character in your product's story. It should support the main hero—your product—without stealing the spotlight.
Using Props to Add Context and Scale
Props can be powerful storytelling tools, but you have to use them with intention. The golden rule is that every single prop should have a clear purpose. Does it help show the product's size? Does it suggest how the product is used? If the answer is no, it's probably just clutter.
For a handmade journal, for example, props like a fountain pen and a cup of coffee can create a scene that evokes creativity and calm. For a skincare product, a few fresh botanicals can visually communicate the natural ingredients inside. The goal is always authenticity, not just filling empty space. To really make your products shine and tell a compelling story, understanding broader visual merchandising guidelines can be incredibly helpful.
The Psychology of Visual Storytelling
To take product shots that actually persuade buyers, you need to understand a bit of consumer psychology. It’s no secret that visual content is a powerful communication tool; 65% of people are visual learners. In fact, content with relevant images gets 94% more views than content without them. This just goes to show how crucial styling is for grabbing attention and driving sales.
Ultimately, your visual style should be so consistent that a customer can recognize your brand from a photo alone. This visual language works hand-in-hand with your written content to create a cohesive and powerful listing. For more on that, check out our guide on https://www.ecorn.agency/blog/how-to-write-product-descriptions-that-drive-sales-and-conversions.
Nailing Your Camera Settings for Sharp Photos
Let’s be honest, switching your camera to manual mode can feel like you’re trying to pilot a spaceship. All those dials for aperture, ISO, and shutter speed are intimidating. But trust me, getting a handle on these three settings is the secret to capturing consistently sharp, professional-looking product photos.
Think of them as the “exposure triangle.” They all work together to control the light hitting your camera’s sensor. When you adjust one, you have to compensate with another to keep the exposure just right. Mastering this balancing act is what gives you complete creative control over the final shot.
Prioritize Aperture for Maximum Sharpness
For product photography, the single most important setting is your aperture, which you’ll see on your camera as an "f-stop" (like f/8 or f/11). The aperture directly controls your depth of field—that is, how much of your photo is in sharp focus from the very front to the very back.
You've probably seen portraits where the subject is sharp and the background is a beautiful blur. That’s a shallow depth of field, created by a low f-stop (like f/2.8). While that looks great for people, it’s a total disaster for products.
You need your entire product to be crisp and clear. To achieve that, you need a high f-stop, which creates a deep depth of field. A fantastic starting point for most product shots is somewhere between f/8 and f/11. This range is the sweet spot that ensures everything on your product is tack-sharp.
Pro Tip: It might be tempting to crank your aperture all the way up to f/22, thinking it'll make things even sharper. It won't. Most lenses actually get a little less sharp at their absolute highest settings because of an optical effect called diffraction. Stick to the mid-range for the best results.
Keep Your ISO Low for Clean Images
Next up is ISO. This setting dictates your camera's sensitivity to light. A high ISO can brighten up a dark scene, but it comes with a serious downside: digital noise. Noise is that ugly, grainy texture that makes photos look amateurish. For clean, high-quality product shots, a low ISO isn't just a suggestion—it's a rule.
Your goal should always be to shoot at your camera's base ISO, which is usually ISO 100 or 200. This gives you the cleanest possible image file, packed with detail and rich color, without any of that distracting grain. Plus, clean files give you way more wiggle room during the editing process.
Of course, using a low ISO and a high f-stop means you're letting less light into the camera. To compensate, you’ll need a slower shutter speed. And that brings us to the one piece of gear you absolutely cannot skip.
Why a Tripod is Non-Negotiable
A good tripod is the unsung hero of product photography. When you're using a high f-stop and a low ISO, your shutter speed often needs to be slow—too slow to handhold the camera without getting blurry photos from natural hand shake. A sturdy tripod eliminates this problem completely.
With your camera locked down, you can use a shutter speed of 1/15th of a second, a full second, or even longer without a hint of blur. This stability is what allows you to use the best aperture and ISO settings for maximum image quality, guaranteeing a perfectly sharp photo every single time. It's the best investment you can make to immediately improve your product shots.
Editing Your Photos to Perfection
Getting the shot is only half the job. Post-processing is where a good photo becomes a great one, giving it that final polish that makes your product truly shine.
Think of editing not as a chore to fix mistakes, but as a chance to enhance what you’ve already captured. The goal here is accuracy and impact—not slapping on heavy filters that make your product look like something it isn't.
You really don’t need to be a Photoshop guru to get professional results. Focusing on just a few key adjustments can create consistent, high-quality images that build customer trust and, ultimately, drive sales.
Start with the Foundational Edits
Before you get into the fancy stuff, you have to nail the basics. These are the non-negotiable tweaks that form the foundation of any solid product photo.
No matter what software you’re using—from Lightroom on your phone to a desktop program—start with these three things:
- Cropping and Straightening: First things first, get it straight. Use the gridlines in your editing tool to make sure the product is perfectly aligned. A slightly crooked photo just looks sloppy. Crop in to remove any dead space and strengthen the composition—a 4:3 ratio is a good, standard starting point.
- White Balance Correction: This one is critical. If your “white” background has a yellow or blue tint, your product’s colors are off, too. Use the white balance tool to neutralize the background, which ensures your product colors are true-to-life. This simple step can drastically reduce returns from customers who received something that didn't match the picture.
- Exposure and Contrast Tweaks: Gently brighten the image so the product pops, but don't overdo it and wash out the details. A slight bump in contrast can add a bit of depth and make the edges appear sharper, giving the whole photo a more defined, professional feel.
Editing is about bringing out the best in your photo, not creating something artificial. The most effective edits are the ones a customer never notices; they just see a fantastic product.
Refining and Retouching for a Flawless Finish
Once the core adjustments are locked in, it’s time to zoom in on the finer details. This is where you clean up any minor imperfections that might distract a potential buyer.
Scan the image for little things like dust specks on the item, a smudge on a reflective surface, or a small wrinkle in the backdrop. The spot removal tool is your best friend here. These tiny fixes take just a few seconds but make a world of difference in the final result, making it look clean and professional.
Creating a consistent editing recipe is also crucial for building a cohesive brand. You can save your core adjustments as a preset and apply it to every photo from the shoot. This guarantees that all your images have the same brightness, contrast, and color tone, which creates a much more trustworthy shopping experience.
Finally, when you’re ready to export, always optimize your images for the web to keep your site loading fast. For a much deeper dive into this, our complete guide to image optimization for Shopify has everything you need to know.
Let's be honest, just having a clean, static photo isn't enough anymore. If you want to stay ahead of the curve, you have to think about where product photography is heading. The future is all about closing the gap between scrolling on a screen and actually holding a product in your hands. It's about creating an interactive, immersive experience.
The biggest shift we're seeing is the move toward giving customers control. They don't just want to look at a picture; they want to play with it. This is where 360-degree photography becomes a non-negotiable. Letting a shopper spin a product around to see every single angle builds an incredible amount of trust and seriously cuts down on returns because people know exactly what they're buying.
Embracing Interactive Technologies
Beyond just spinning an image, new tools are letting customers see how your products fit into their world. This isn't some far-off, futuristic concept anymore—it's actively setting brands apart and creating a shopping journey that people actually remember.
The best part? These technologies are becoming way more accessible for businesses of all sizes. Here are the two big ones you should have on your radar:
- 3D Models: Think of this as the next level up from a 360-degree view. It's a complete digital twin of your product. Customers can zoom in on the tiniest details, rotate it with total freedom, and get a real feel for its shape, size, and texture.
- Augmented Reality (AR): This is where things get really cool. AR lets a customer use their phone's camera to place that armchair in their living room or see how that painting looks on their wall, all in real-time. It's a game-changer.
When you let customers "try before they buy" in a virtual space, you're not just selling an item—you're selling them confidence in their purchase. That kind of immersive experience is what separates the leading brands from everyone else.
The Rise of Immersive E-commerce
Across the board, technology is completely changing how great product shots are made and used. The rise of 3D product photography and AR is rewriting the rules for e-commerce visualization. Giving online shoppers the ability to dynamically interact with products—spinning, zooming, and inspecting them from all sides—is the closest you can get to an in-person experience online. You can find more insights on these evolving product photography trends at colorexpertsbd.com.
Jumping into these technologies might feel like a huge leap, but you don't have to do it all at once. Even starting with simple 360-degree photos can deliver a massive return. As these tools get easier to use, they’ll quickly become a standard expectation for online shoppers. Future-proofing your photography means getting ready for that interactive shift right now.
Ready to take your entire e-commerce strategy to the next level, from stunning visuals to sky-high conversion rates? The team at ECORN specializes in Shopify design, development, and CRO to help your brand scale effectively. Start your project with us today!


How to Promote on TikTok for eCommerce in 2026

B2B eCommerce Consulting That Drives Real Revenue

10 Best Practices for Site Navigation in 2026

Return vs Refund for Shopify Stores: A Practical Guide

What Is Customer Lifetime Value and Why It Matters

What Is Voice of Customer Research for eCommerce

SMS Marketing for Ecommerce That Actually Converts

Master How to Improve Email Deliverability in 2026

Top 7 eCommerce Partners NYC for Shopify Brands in 2026

Machine Learning for Ecommerce: Boost Your Shopify Store

Beauty Market Research: Your 2026 Growth Guide

Shopify International Expansion: A 2026 Roadmap

What Does CRO Stand for in Business: Understanding CRO

Shopify Visual Merchandising: A Playbook for Higher Sales

Shopify Landing Page Design: Master Conversion in 2026

10 Best AI SEO Optimization Tools for Shopify in 2026

Agentic AI for Ecommerce: Boost Your Sales in 2026
Mastering Email Marketing Data for eCommerce Growth

Conversion Rate Optimisation Australia: Boost Your Sales

Conversion Rate Optimization AI: Your Shopify Store Guide

10 Product Bundling Strategies for Shopify in 2026

How to Increase Customer Lifetime Value: A Shopify Playbook

AI Customer Service Automation: Shopify Guide 2026

Clean Website Design: A Shopify Conversion Playbook

Omnichannel Retail Strategy: A Shopify Playbook

Product Data Enrichment: A Guide for Shopify Brands

Instagram Shopping Features a Guide for Shopify Stores

What Is Revenue Optimization: A Holistic RevOps Guide

Benefits of Conversion Rate Optimization: Boost Your

WordPress to Shopify Migration: Your 2026 Seamless Switch

Boost Sales: Ecommerce Payment Processing Guide 2026

Unified Commerce Platform: Benefits, KPIs & Shopify Guide

How to Reduce Bounce Rate eCommerce: Your 2026 Guide

Shopify API Integration: A Practical End-to-End Guide

How to Implement Data Governance: A 2026 Guide

Shopify Store Development Cost: A 2026 Breakdown
What Is Server Side Tracking: The Shopify Guide 2026

Marketing Automation Workflows: A Shopify Guide for 2026

Shopify: How to Reduce Technical Debt

Shopify UX Design Change: A Playbook for Growth

User Generated Content Strategy: Shopify Playbook

Shopify Pause and Build Plan Cost: A Complete 2026 Guide

Compare at Price on Shopify: A Complete Guide for 2026

Where Can I Sell My Prints? 10 Best Platforms for 2026

Shopify Order Management System: The Ultimate Guide 2026

What Is Marketing Attribution? an eCommerce Guide for 2026

10 Best Black Friday Sales Sheets for 2026

Discover the Top Social Media Marketing Agencies For

Consumer Confidence Definition for eCommerce in 2026

What Is Social Commerce? Your 2026 Guide to Boosting Sales

A Social Ad Campaign Playbook for eCommerce Growth

7 Best FAQ Page Examples for SaaS & eCommerce

Market Research in Fashion Industry: A Guide for Shopify

Shopify Migration Services: Expert Guide for 2026

Mastering FB Retargeting Ads for Shopify in 2026

What Is Omnichannel Ecommerce

Master Your Shopify Plus Migration: The 2026 Guide

Shopify Integration Services: A Merchant's 2026 Guide

Shopify Collection Description: A Guide to SEO & Sales

Shopify Plus Contact: Reach Sales & Support Effectively

Top Luxury Shopify Stores: Design & UX Strategies

How to Improve Customer Experience: A Shopify Roadmap

Creative Facebook Ads: 10 Examples for Shopify Brands

Remarketing with Facebook Ads: A Shopify Guide for 2026

SEO Linking Strategies for Shopify Stores

Top 7 Statistics YouTube Channels for eCommerce in 2026

Hiring Shopify Plus Designers: A Founder's Guide

Shopify Product Variation: Master Your Variants for 2026

Leverage Ai Solutions Brands: Your 2026 Shopify Growth Guide

Filters in Shopify: A Guide for Growing Brands

Shopify Plus Developer: A Guide for Growing Brands

When Does Black Friday Online Start? A 2026 Guide

Black Friday Email Marketing: Shopify & Klaviyo Guide

Polaris Design System: The Complete Shopify Guide

How to Hire a Consultant Email Marketing Expert

What Is Q4? A Shopify Merchant's Guide to Peak Season

Marketing Organization Structure for eCommerce Growth

Top Account-Based Marketing Agency Guide for 2026

7 Remarketing Ad Examples for Your 2026 Campaigns

AI Retail Solutions: Boost Your Shopify Store

Migrate to Shopify: The Definitive 2026 Guide

Shopify Authentication App: A Guide for Secure Stores

Why Strategic Marketing Is Important for Growth in 2026

How to Create a Size Chart in Shopify: 2026 Guide

Shopify Themes for Jewelry: The Definitive 2026 Guide

Minimal Shopify Templates: Faster, Higher-Converting Stores

Maximize Profit: Shopify CC Fees 2026 Guide

Best Shopify Apps for Beginners in 2026

How to Improve Online Shopping Experience in 2026

Shopify Design and Development Services: A 2026 Guide

Small Business Social Media Marketing Agency: A Hiring Guide

Bulk Edit Shopify: A Guide to Save Hours on Store Updates

2026 Trends in Food and Beverage Industry

Post Purchase Survey Guide for Shopify Stores

How to Build an Ecommerce Brand in 2026

Conversion Rate Optimization for Ecommerce: Maximize Profit

How to Use Customer Data to Increase Sales: A Guide

Shopify for Enterprise: The 2026 Deep Dive Guide

Email Marketing Agencies: The Guide for Shopify Brands

Boost Sales With The Right Shipping Shopify App


newsletter in your inbox