
Deciding to move your store from BigCommerce to Shopify isn't just a technical switch—it's a strategic move for brands ready to scale. The process is more than just data migration; it's about setting up a new theme, nailing your SEO, and ensuring the entire transition is seamless for your customers.
Why Smart Merchants Move from BigCommerce to Shopify
Replatforming is a serious business decision, not some small task you hand off to IT and forget. For the thousands of merchants making this exact move, the choice to leave BigCommerce behind almost always comes down to a few powerful, future-proofing advantages. It’s all about giving your brand the best possible tools to compete and grow.
And this isn't just a trend for startups. We're seeing more and more enterprise-level brands migrate to Shopify. They're drawn to its unified commerce capabilities and the relentless pace of innovation coming from the platform. It's an upgrade designed to unlock long-term value.
Tapping into a Superior App Ecosystem
One of the biggest motivators is the sheer scale and quality of the Shopify App Store. BigCommerce comes with a lot of features baked in, which sounds great until you need to do something specific it wasn't designed for. That's when you feel the limitations.
Shopify's model is different. It gives you the power to build a completely custom tech stack from over 8,000 apps. This freedom means you can adapt on the fly and stay ahead of the curve. You can integrate things like:
- Sophisticated loyalty programs to keep your best customers coming back.
- Advanced subscription models to build predictable, recurring revenue.
- Powerful marketing automation tools that streamline your campaigns and save you time.
Achieving Greater Scalability and Mobile Optimization
When a flash sale or a viral post sends a flood of traffic your way, the last thing you want is a site that slows down or, worse, crashes. Shopify is legendary for its ability to handle massive traffic spikes without breaking a sweat, giving you rock-solid reliability you can build a business on.
On top of that, merchants often choose Shopify for its top-notch mobile optimization. For a full breakdown of how the platforms stack up, our ecommerce platform comparison gets into the nitty-gritty details.
From what we've seen, businesses making the switch point to some very real benefits. Shopify's mobile-first themes create a perfect experience on phones and tablets, which is non-negotiable now that mobile commerce accounts for over half of all online sales. Plus, its hosted environment takes security and maintenance off your plate, freeing you up from a ton of technical headaches.
Ultimately, making the move from BigCommerce to Shopify is an investment in your brand's future. It plugs you into a community, an infrastructure, and a set of tools designed not just to keep up, but to lead in a fiercely competitive market.
Creating Your Migration Blueprint
Let's be honest: a successful move from BigCommerce to Shopify is won or lost long before you touch a single line of code or import a CSV file. The planning phase is everything.
Rushing into the technical steps without a clear strategy is a classic recipe for disaster. I've seen it lead to blown budgets, missed deadlines, and—worst of all—critical data getting lost in the shuffle. Think of this blueprint as the architectural plan for your new storefront; it makes sure everything has a place and a purpose before the "construction" begins.
The very first thing on your to-do list is a full-scale audit of your current BigCommerce store. This isn't just a quick glance. It’s a deep, detailed inventory of every single asset you've built over the years. Taking the time to catalog everything now gives you a crystal-clear picture of what needs to move, what can be improved, and what might be better left behind.
Inventory Your Digital Assets
Get a spreadsheet open and start creating a master list of everything that makes your store tick. A thorough audit is your best defense against forgetting something crucial.
- Core Data: This is your non-negotiable list. It includes all products (don't forget variants, SKUs, and pricing), every customer account, and your complete order history.
- Content Library: All that hard work on content needs to come with you. This means product descriptions, collection pages, blog posts, and those essential static pages like "About Us" and "Contact."
- Apps and Integrations: List every single BigCommerce app you're currently using, from your loyalty program to your shipping calculator. Make a note of what each one does so you can hunt down its Shopify equivalent later.
Once your inventory is complete, you can start to map out how you'll actually get all this data from point A to point B. This decision tree infographic is a great way to visualize which approach makes the most sense for your store's specific needs.
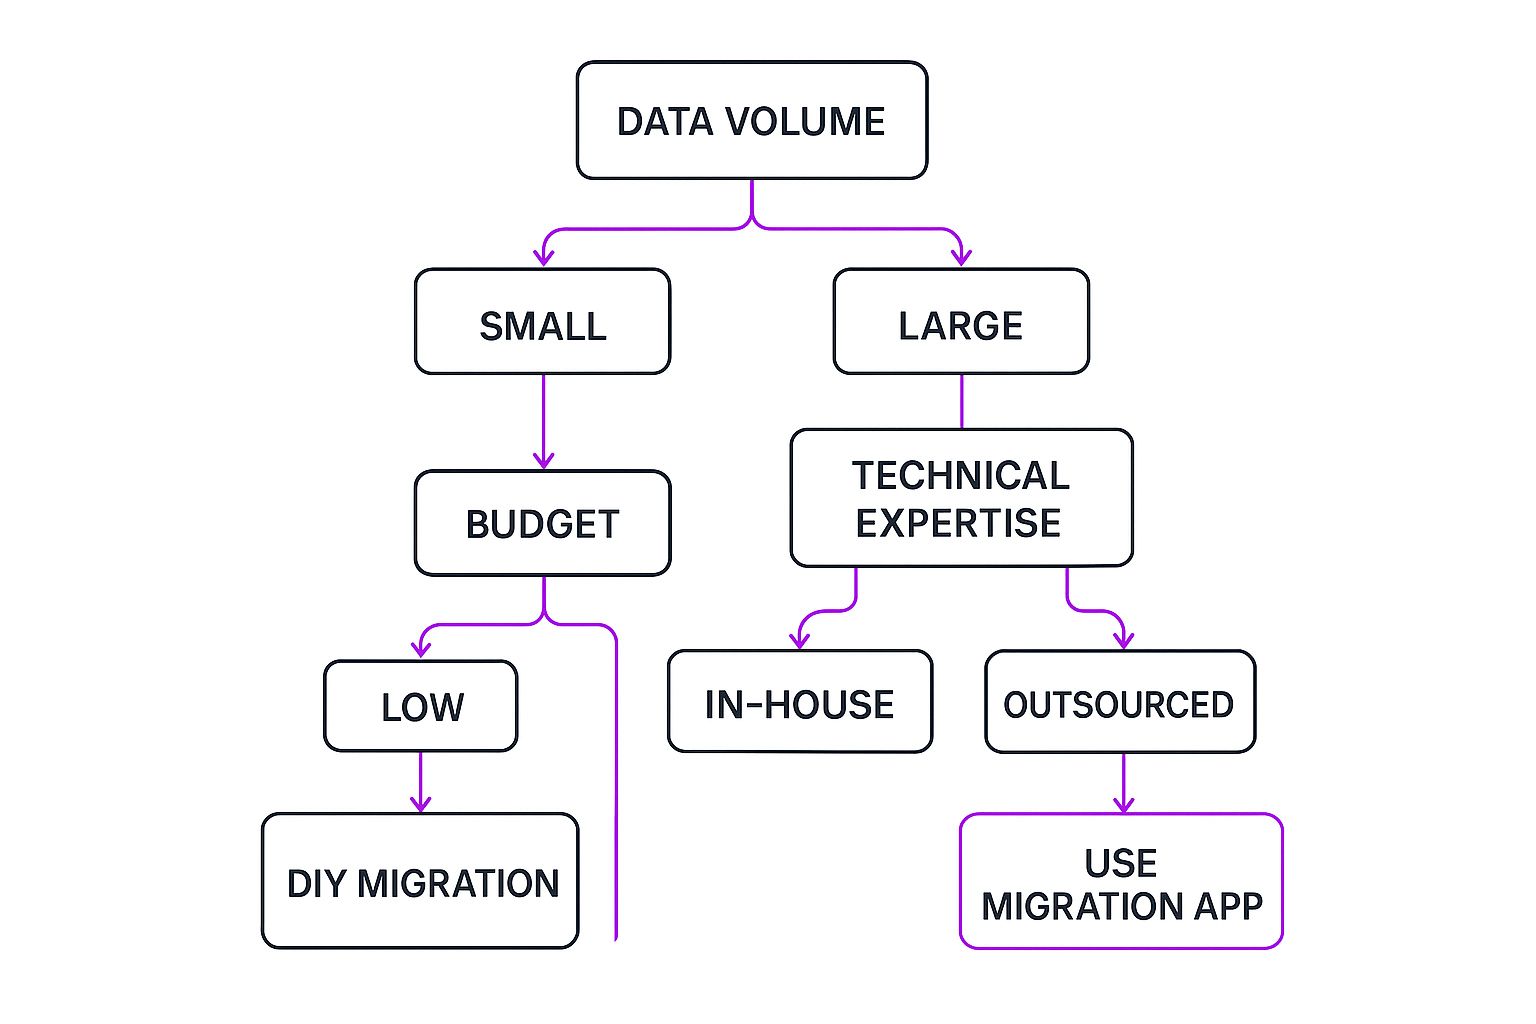
As you can see, things like your data volume, budget, and in-house technical skill will point you toward the most logical migration method for your business.
Choosing Your BigCommerce to Shopify Migration Method
Deciding how to move your data is a major fork in the road. Each path has its own set of trade-offs in terms of cost, time, and technical complexity. This table breaks down the three main approaches to help you figure out which one is the right fit for your situation.
Ultimately, the best choice depends entirely on your store's scale and your team's resources. Don't just default to the cheapest option; consider the hidden cost of your own time and the potential risks of a botched manual migration.
Set a Realistic Timeline and Budget
"How long will this take?" It's the million-dollar question, and the honest answer is: it depends entirely on your store's complexity.
Moving from BigCommerce to Shopify is a serious project, especially for larger operations. Enterprise brands with over 50,000 SKUs should brace for a replatforming timeline of around 39 weeks. For mid-sized stores, a more realistic window is 20 to 30 weeks, while smaller businesses might pull it off in 16 to 20 weeks. You can get a better sense of the investment by exploring these detailed enterprise migration timelines.
Your budget has to cover more than just the monthly Shopify subscription. You need to factor in the cost of a new premium theme, all those new monthly app subscriptions, and any potential developer fees if you need custom work done. Planning for these expenses right from the start saves you from nasty surprises down the road.
Finally, write down your goals. What's the point of this whole migration? Are you trying to boost conversion rates with a better mobile experience? Or maybe you want to streamline your operations with Shopify's automation tools? Having clear, defined objectives will guide every decision you make and turn what feels like a daunting task into a manageable and strategic project. This blueprint is your key to a successful, organized, and stress-free migration.
Alright, let's roll up our sleeves and get into the technical side of things: moving your core data. This part often feels like the most daunting step, but if you break it down, you can move from BigCommerce to Shopify without leaving critical information behind. We’re talking about the three pillars of your business: your products, your customers, and all that valuable order history.
It all starts inside your BigCommerce admin panel. You’ll need to export each of these data sets into its own CSV (Comma-Separated Values) file. Think of these files as the raw digital DNA of your store, which you’ll then format and upload into its new home on Shopify.

Getting Your Data Out of BigCommerce
First up, your products. Head over to the "Products" section in your BigCommerce dashboard and find the export function. Be very careful here—you need to select an export template that includes everything. I'm talking variants, images, SKUs, and especially any custom fields you're using. If you skimp on this step, you're signing yourself up for a massive cleanup job on the other side.
Once that's done, you'll do the same for your customer list. This export will pull all their names, email addresses, and shipping info. Finally, run another export for your complete order history. Having these three clean CSV files is your foundational first move.
A Word of Advice: Don't even think about importing these CSVs directly into Shopify. Treat them like a rough draft. You absolutely have to open them up and clean them. Mismatched column headers, wonky formatting, or extra characters are the number one reason I see imports fail.
Choosing Your Migration Path
With your raw data in hand, you've got a decision to make. How are you actually going to get it into Shopify? There are a few different ways to tackle this, each with its own pros and cons.
- Manual CSV Import: Shopify has a built-in tool that lets you upload product and customer CSV files. For smaller stores with a pretty straightforward product catalog, this can work just fine. It’s free, and you have total control. The downside? It's slow, tedious, and very easy to make a mistake that messes up your data.
- Third-Party Migration Apps: This is the sweet spot for most businesses. Apps like LitExtension or Cart2Cart are built for this exact purpose. They automate the whole process, moving over your products, customers, and—crucially—your order history, which Shopify’s native importer won't touch. Yes, they cost money, but they can save you dozens of hours and prevent some major headaches.
- Hiring a Shopify Expert: If you're running a large, complex store with years of data and a ton of customizations, bringing in an expert or an agency is the smartest play. They’ll manage the entire migration from start to finish, handle tricky data mapping, and troubleshoot any weird issues that pop up.
No matter which route you take, do not skip a small-scale test. Migrate a sample of 10-20 products and a handful of customers first. This lets you confirm everything is mapping correctly before you commit to moving your entire store's data.
Navigating Common Data Headaches
A successful migration isn’t about avoiding problems—it's about anticipating them. From my experience, a few specific data types almost always cause trouble when moving from BigCommerce to Shopify.
The biggest culprit is usually product variants. BigCommerce and Shopify handle product options (like size and color) differently. You have to make sure your CSV is formatted just right so Shopify can group them properly. A classic mistake is having each variant import as a separate product, which creates a huge mess in your catalog and a confusing experience for shoppers.
Another one to watch out for is custom fields. If you used these in BigCommerce to store extra product info like "material composition" or "washing instructions," that data has nowhere to go in Shopify by default. You’ll need to map this information to Shopify Metafields. This might mean editing your CSV manually or using a specialized app to get it done.
Finally, and this is a big one: you cannot migrate customer passwords. It's just not possible due to security and encryption protocols. While their accounts and order histories will come across, every single customer will need to create a new password on your new Shopify site. You'll need to plan for this. A friendly and clear post-launch email campaign inviting them to "activate their new account" is the best way to handle it.
Designing and Customizing Your New Shopify Store
With your core data now living in Shopify, it's time to shift from the technical backend to the creative frontend. This part is honestly where the fun begins. You get to craft a customer experience that not only looks incredible but is built to convert. This is your chance to build a better, faster, and more engaging storefront than you ever had on BigCommerce.
And let’s be clear: this isn’t just about making your new store look like the old one. This is a golden opportunity to elevate your brand entirely. The whole process kicks off by selecting a theme—the visual foundation of your entire store.
Choosing and Customizing a Theme
The Shopify Theme Store is packed with free and premium options, and your choice here really does have an impact on functionality and how customers see your brand. Free themes are perfect for getting started quickly, but premium themes (which usually run $200-$400) often provide deeper customization, more built-in features, and unique layouts that help you stand out from the crowd.
Whatever you choose, your number one priority should be a mobile-first design. Most shoppers are on their phones, and a clunky mobile experience is a surefire way to lose sales. Get familiar with Shopify’s theme editor—it's where you'll tweak colors, fonts, and layouts to get everything perfectly aligned with your brand identity.
Replicating Functionality with the Right Apps
One of the biggest worries I hear from merchants when they move from BigCommerce to Shopify is losing built-in features. The reality? Shopify’s massive app ecosystem almost always offers a more powerful, specialized alternative. Your job is to map your old BigCommerce add-ons to new Shopify apps.
Here are some common swaps you'll likely need to make:
- Product Reviews: Ditch the basic review system for apps like Judge.me or Loox. These unlock photo and video reviews, which is incredibly powerful social proof.
- Loyalty Programs: Go beyond simple points with apps like LoyaltyLion or Yotpo. They let you build sophisticated, tiered reward programs that genuinely drive repeat business.
- Email Marketing: This is non-negotiable. Integrate a dedicated email service provider like Klaviyo for advanced segmentation and automation that blows basic platform capabilities out of the water.
The sheer scale of Shopify's user base is what fuels this app dominance. With roughly 2.54 million live stores, Shopify is a magnet for top-tier developers. For comparison, BigCommerce has around 41,221 active stores, so its app market is naturally smaller. You can find more detail on these platform statistics on RedStagFulfillment.com.
Configuring Essential Business Settings
With your design coming together, it’s time to dial in the operational backbone of your store. These settings in your Shopify admin panel are all about how you handle money and fulfillment.
First up, payment gateways. Activating Shopify Payments is a must. It unlocks Shop Pay, an accelerated checkout that can dramatically boost conversion rates by making the payment process seamless for millions of shoppers.
Next, get your shipping rules sorted. Shopify lets you create detailed shipping zones, set flat rates, offer free shipping thresholds, and pull real-time rates from major carriers. Pro tip: don’t forget to add your default package dimensions to get more accurate quotes from the start.
Finally, tackle taxes. Shopify’s tax engine is a lifesaver. It can automatically calculate and collect sales tax based on your business location and the customer’s address, which saves a massive amount of time and helps ensure you’re compliant. Getting these settings right is the last big step before you can start prepping for launch.
Protecting Your SEO During the Switch
You've likely poured years of effort into building your domain authority and clawing your way up the search rankings. The absolute last thing you want is for a platform migration to torch all that hard work.
Let's be blunt: a sloppy SEO transition can completely destroy a site's traffic overnight. This makes it, without a doubt, the single most critical part of your move from BigCommerce to Shopify.
Think of this not as one big task, but as a series of deliberate steps designed to give search engines a crystal-clear roadmap of what's changed. If you drop the ball here, you'll confuse Google's crawlers, leading to a flood of broken links, plummeting rankings, and a nosedive in organic traffic that can take months, or even years, to recover from.
Master the Art of the 301 Redirect
The heart and soul of any SEO-safe migration is the 301 redirect. It’s essentially a permanent change-of-address form for your web pages. It tells both search engines and user browsers that a page has moved for good, not just temporarily.
This simple command is non-negotiable. It’s how you pass the vast majority of "link equity"—all that precious SEO value—from your old BigCommerce URLs to your new Shopify ones.
Your main mission here is to create a detailed 301 redirect map for every single important page on your old site. Don’t cut corners. This must include:
- Product pages: Every last item in your catalog needs its own redirect.
- Category pages: These are often your biggest traffic drivers, so they're a top priority.
- Blog posts: All that content marketing work can't go to waste. Map every article.
- Informational pages: Your "About Us," "Contact Us," and policy pages all carry weight and need to be mapped.
Without these redirects, anyone clicking an old link from Google or another site will slam into a 404 "Page Not Found" error. That’s a terrible user experience, and it's a huge red flag for search engines. To properly protect your visibility, building and sticking to a comprehensive SEO strategy is essential.
Implementing Your Redirect Strategy
First things first, you need a complete list of every URL on your current BigCommerce site. A crawler tool like Screaming Frog is perfect for this; it will spider your entire site and spit out a clean list.
Next, you'll map each old URL to its new Shopify equivalent in a simple spreadsheet. The URL structures are different, so you'll need to be meticulous.
Once your map is complete and double-checked, you can use Shopify’s built-in "URL Redirects" feature to import your spreadsheet as a CSV file. This bulk import will save you from the mind-numbing task of entering hundreds or thousands of redirects by hand.
A critical step people often forget is migrating your metadata. Go back and double-check that all your carefully crafted title tags and meta descriptions made the journey. This data is vital for your click-through rate in search results. Don't assume it all transferred perfectly.
Your Final SEO Pre-Launch Checklist
Right before you pop the champagne and go live, run through this final checklist. This is your last chance to catch any potential SEO disasters.
Set Up Google Tools: Get Google Analytics installed on your new store. Crucially, use the same property ID as your old site to maintain your historical data. You also absolutely must add and verify your new Shopify domain in Google Search Console.
Submit Your New Sitemap: The second your new site is live, find your new XML sitemap (it's usually at
yourstore.com/sitemap.xml). Grab that URL and submit it immediately through Google Search Console. This is like sending a direct invitation to Google, telling it to come crawl and index your new site structure right away.
Your Go-Live Checklist and Post-Launch Plan
You’re so close to the finish line, but the steps you take right before launch are absolutely make-or-break. Before you even think about flipping the switch, a deep, meticulous pre-launch check is essential. This is your chance to catch any little gremlins that could mess up the customer experience or throw a wrench in your operations.
Don't just assume everything works. You need to become your most nit-picky customer. The single most important test? Place a real order using a live credit card. Go through the entire motion, from adding a product to your cart all the way to getting that confirmation email in your inbox.
The Final Pre-Launch Systems Check
Right before you point your domain to its new Shopify home, run through this final systems check. It’s the best way to prevent those dreaded launch-day surprises.
- Test the Full Checkout Flow: Don’t just place one order. Place several. Use a discount code. Test out different shipping options. Make sure you buy a product that has variants to see if that works correctly.
- Verify Redirects: Grab a list of your most important old URLs and spot-check them. Use a redirect checker tool to make sure your 301s are landing on the right new Shopify pages without any hitches.
- Confirm App Functionality: Do your review apps, loyalty programs, and email pop-ups actually work on the new theme? Don't just look—interact with them. Test the core function of every single one.
Your go-live checklist shouldn't just be about the technical stuff. You need a solid game plan for how to promote a site from zero to launch. A flawless technical launch combined with a smart marketing push is what truly makes a new store fly.
Post-Launch Monitoring and Communication
Once your store is officially live on Shopify, your job isn't done. It just shifts from building to monitoring. For the first 48-72 hours, you need to be glued to your analytics and Google Search Console. Be on the lookout for any weird spikes in 404 errors—that's a tell-tale sign of a missed redirect.
This is also your moment to share the good news with your customers. Send out a celebratory email announcing the new and improved store. It's crucial to frame this as a win for them. Talk up the faster load times, the buttery-smooth checkout, or any cool new features you've added.
Of course, this is just one piece of the puzzle. For a complete A-to-Z guide, our Shopify migration checklist is an indispensable tool. Following a structured plan like this ensures your move from BigCommerce to Shopify is the successful upgrade you've been working toward, perfectly setting the stage for future growth.
Answering Your BigCommerce Migration Questions
Even the most buttoned-up migration plan comes with its fair share of "what if" scenarios. Let's walk through some of the most common questions I hear from merchants making the move from BigCommerce to Shopify. Getting these details ironed out now will save you headaches later.
Will I Lose Customer Passwords and Payment Details?
Yes, you will—and that's a good thing. For security and data protection reasons, you absolutely cannot migrate sensitive info like customer passwords or saved credit card details between platforms. This isn't a bug; it's a critical feature designed to protect your customers.
Once the migration is done, you'll need to invite your customers to create new accounts on your Shopify store. Shopify has built-in tools to send bulk account invitation emails, which makes this pretty straightforward. Just be sure to frame it to your customers as a necessary security upgrade for their protection.
What's This Migration Really Going to Cost Me?
The final price tag can swing wildly depending on how you approach it. A completely manual, do-it-yourself migration is obviously the cheapest in terms of cash outlay, but it’s a massive time sink and carries the highest risk of things going wrong.
The most popular route is using a dedicated migration app. These services usually base their fees on how much data you're moving (products, customers, orders). Expect to pay anywhere from $50 to several hundred dollars.
If you want a completely hands-off experience with a professional guarantee, hiring a Shopify Expert or a migration agency is the way to go. This will cost several thousand dollars, but it removes the entire technical burden from your plate and ensures a seamless, expert-led transition.
What Should I Do With My Old BigCommerce Store?
After your new Shopify store is live, running smoothly, and you've seen orders coming through without a hitch, it's time to cancel your BigCommerce subscription. You don't want to pay for two platforms.
But don't be too hasty.
I always tell clients to keep their BigCommerce store active for about a week post-launch. Think of it as a temporary safety net. Just make sure you password-protect it or find another way to make it inaccessible to the public. After that one-week grace period, you can confidently cancel the plan, knowing your Shopify store is humming along perfectly.
Ready to make your move to Shopify a seamless success? The expert team at ECORN specializes in Shopify migrations, design, and conversion rate optimization to help your brand scale effectively. Let's build your future on Shopify together.


Compare at Price on Shopify: A Complete Guide for 2026
Where Can I Sell My Prints? 10 Best Platforms for 2026
Shopify Order Management System: The Ultimate Guide 2026
What Is Marketing Attribution? an eCommerce Guide for 2026

10 Best Black Friday Sales Sheets for 2026

Discover the Top Social Media Marketing Agencies For
Consumer Confidence Definition for eCommerce in 2026
What Is Social Commerce? Your 2026 Guide to Boosting Sales

A Social Ad Campaign Playbook for eCommerce Growth
7 Best FAQ Page Examples for SaaS & eCommerce

Market Research in Fashion Industry: A Guide for Shopify
Shopify Migration Services: Expert Guide for 2026
Mastering FB Retargeting Ads for Shopify in 2026
What Is Omnichannel Ecommerce
Master Your Shopify Plus Migration: The 2026 Guide
Shopify Integration Services: A Merchant's 2026 Guide
Shopify Collection Description: A Guide to SEO & Sales
Shopify Plus Contact: Reach Sales & Support Effectively

Top Luxury Shopify Stores: Design & UX Strategies
How to Improve Customer Experience: A Shopify Roadmap

Creative Facebook Ads: 10 Examples for Shopify Brands

Remarketing with Facebook Ads: A Shopify Guide for 2026

SEO Linking Strategies for Shopify Stores
Top 7 Statistics YouTube Channels for eCommerce in 2026

Hiring Shopify Plus Designers: A Founder's Guide

Shopify Product Variation: Master Your Variants for 2026

Leverage Ai Solutions Brands: Your 2026 Shopify Growth Guide

Filters in Shopify: A Guide for Growing Brands

Shopify Plus Developer: A Guide for Growing Brands

When Does Black Friday Online Start? A 2026 Guide
Black Friday Email Marketing: Shopify & Klaviyo Guide

Polaris Design System: The Complete Shopify Guide

How to Hire a Consultant Email Marketing Expert

What Is Q4? A Shopify Merchant's Guide to Peak Season

Marketing Organization Structure for eCommerce Growth

Top Account-Based Marketing Agency Guide for 2026

7 Remarketing Ad Examples for Your 2026 Campaigns

AI Retail Solutions: Boost Your Shopify Store

Migrate to Shopify: The Definitive 2026 Guide
Shopify Authentication App: A Guide for Secure Stores

Why Strategic Marketing Is Important for Growth in 2026

How to Create a Size Chart in Shopify: 2026 Guide

Shopify Themes for Jewelry: The Definitive 2026 Guide

Minimal Shopify Templates: Faster, Higher-Converting Stores
Maximize Profit: Shopify CC Fees 2026 Guide

Best Shopify Apps for Beginners in 2026

How to Improve Online Shopping Experience in 2026

Shopify Design and Development Services: A 2026 Guide

Small Business Social Media Marketing Agency: A Hiring Guide

Bulk Edit Shopify: A Guide to Save Hours on Store Updates

2026 Trends in Food and Beverage Industry

Post Purchase Survey Guide for Shopify Stores

How to Build an Ecommerce Brand in 2026
Conversion Rate Optimization for Ecommerce: Maximize Profit
How to Use Customer Data to Increase Sales: A Guide

Shopify for Enterprise: The 2026 Deep Dive Guide

Email Marketing Agencies: The Guide for Shopify Brands
Boost Sales With The Right Shipping Shopify App

Your Guide to the Shopify Site Map

7 Headless Commerce Examples for 2026

Mastering Trends in Cosmetic Industry for 2026
Transfer Shopify to BigCommerce The Complete 2026 Playbook

What Is Shopify Collective? Your 2026 Guide to Success
Unlock Shopify Growth with Site Link SEO

Integrating Shopify and WordPress A Complete Guide for 2026

Naming a Clothing Store: A Shopify Founder's Playbook

Guide to buying shopify store in 2026

Buying shopify store: Buying a Shopify Store: Invest Wisely

Food & Beverage Marketing: A Complete Guide for 2026

Facebook Ads Agency: A Shopify Brand's Hiring Guide

Shopify Apparel Stores: A 2026 Launch & Scale Guide

How to Deactivate Shopify Store: The 2026 Guide

Shopify and Square: The 2026 Ultimate Comparison

Your Guide to Beauty Products Ecommerce

A Guide to Marketing for Beauty Brands in 2026
Your Guide to Facebook Black Friday Ads
Facebook Ad Ecommerce for Shopify Growth

Iconography Web Design The Definitive Guide for Shopify Stores

A Modern Backlinks SEO Strategy for Shopify Stores

How to Launch an Online Store: A Step-by-Step Success Guide

Optimize Shopify Store: Master Performance in 2026
Successful Migration for Shopify: Protect SEO & Grow

Maximize Traffic & Sales: Get Your Free Website Audit Report
Master the Best Ads Facebook Formats for eCommerce Success

How to Find the Best Ecommerce Agency Near Me in 2026

10 Crucial White Hat Techniques SEO for Shopify in 2026
How to Reduce Returns and Boost Profits in Your eCommerce Store
What Is Ecommerce Personalization A Guide to Unlocking Growth

Payment gateways in shopify: The Ultimate Guide for Merchants 2026
Fulfillment services for shopify: Scale Your Ecommerce Brand
Shopify Landing Page Examples: 7 Winning Templates to Boost Conversions
How to Create Urgency in Sales on Shopify

The Best Review Apps for Shopify to Drive Growth in 2026

The Best Ecommerce Platform for Startups in 2026
Choosing Ecommerce Website Design Packages A Complete Guide

Shopify Plus Partners: Guide to shopify plus partners for 2026 growth

How to Find serp feature opportunities: Win SERP Snippets in 2026
Selling on Etsy vs eBay A Guide for eCommerce Brands in 2026

10 Proven Sample Email Campaigns for Shopify to Boost Sales in 2026

A Winning Digital Content Marketing Strategy for Shopify in 2026


newsletter in your inbox