
Getting an online store off the ground might seem like a huge project, but learning how to set up a Shopify store really just boils down to a few key stages. It starts with the creative stuff like naming your store, moves into the technical details of configuring your settings, and ends with flipping the switch to go live. Shopify designed this process to be as painless as possible, so you can go from a spark of an idea to a running business in less than a day.
Your Launch Plan for a Profitable Shopify Store
Jumping into ecommerce is a thrill, and Shopify has become the go-to platform for a reason—it clears away the technical roadblocks. It hands you the tools to get your store online fast, letting you focus on what really drives the business: your products and your customers. Think of this initial setup as the foundation of your entire operation. Getting it right from the very beginning is crucial.
This first phase isn't just about clicking through a setup wizard; it's about making smart, strategic decisions for your brand. You'll brainstorm a memorable name that resonates with your audience and then lock in a professional domain name to build instant credibility. Once that's done, you'll dive into the Shopify dashboard to get the nuts and bolts sorted.
Core Setup and Configuration
Your first moves inside the Shopify admin panel will set the stage for how your business runs day-to-day. This is where you configure the foundational settings that ensure everything from payments to shipping works smoothly and professionally.
You'll need to tackle these essentials right away:
- Business Details: This is where you'll input your legal business name and address.
- Store Currency: Choose the primary currency you’ll be selling in. This is a big one!
- Time Zone and Units: Set your local time zone and the units of measurement (like kg or lbs) you'll use for product weights.
These might feel like small details, but they're the bedrock of your store's operations. They directly impact your sales reports, shipping cost calculations, and even your legal compliance.
I've seen so many new store owners rush through these initial settings only to run into major problems later. Take your time here. An incorrect currency or business address can create massive headaches with payment gateways and tax reporting down the line. It’s worth the extra five minutes to double-check everything.
The good news is that setting up a Shopify store has never been more accessible. The platform now supports over 4.82 million live websites, a testament to how user-friendly it is. Most entrepreneurs can get a basic storefront up and running in just a few hours.
To help you map out your first steps, I've put together a quick checklist that breaks down the essential milestones.
Shopify Setup Quick-Start Checklist
This table outlines the core phases you'll go through to get your store ready for its first customer. Think of it as your high-level project plan.
Following these phases will keep you on track and ensure you don't miss any critical steps before you announce your grand opening.
This infographic also does a great job of visualizing the entire journey from idea to launch.
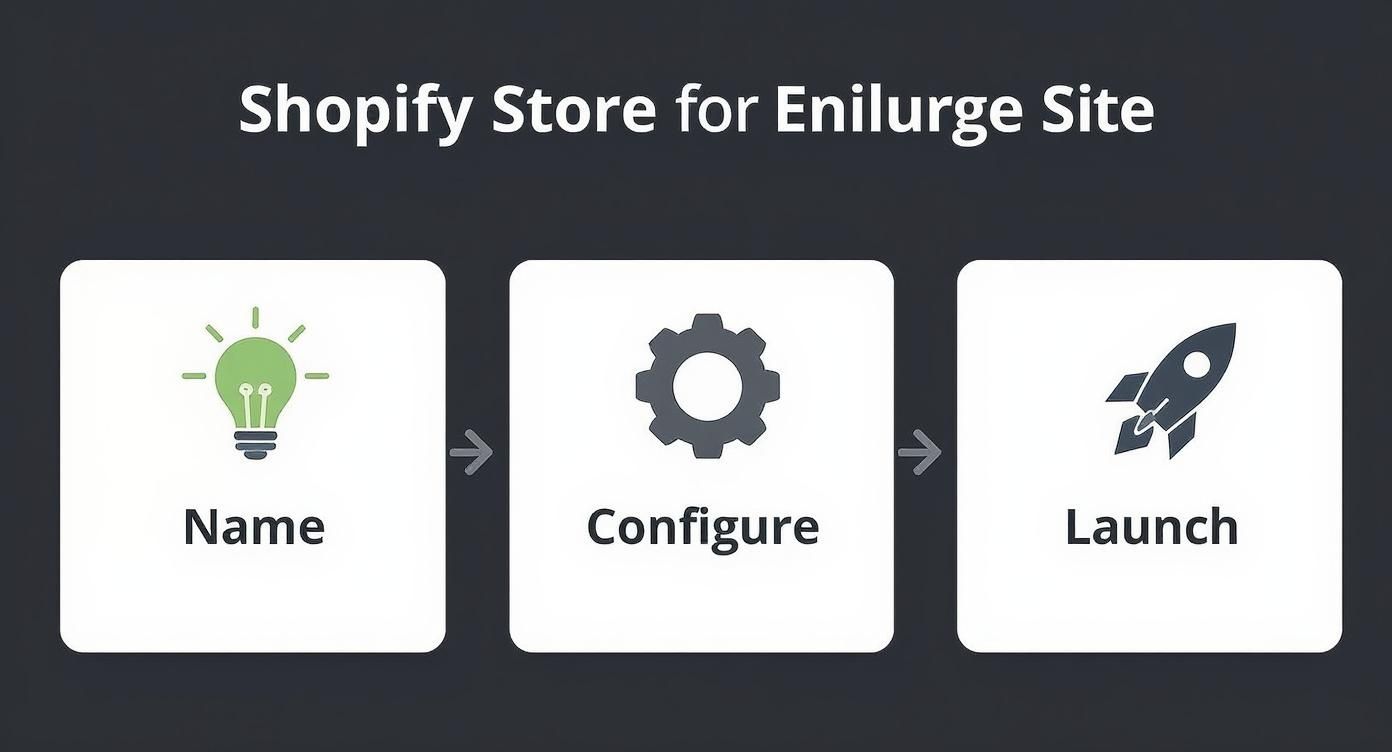
As you can see, the process flows logically from the creative work to the technical setup and, finally, to the exciting part—launching your store to the world.
And if you're venturing into a specific niche like jewelry, it's worth checking out industry-specific advice. For example, this guide on how to start an online jewelry store offers targeted tips that perfectly complement the Shopify setup process. This framework is designed to help any entrepreneur turn their vision into a profitable reality.
Designing a Store That Turns Visitors Into Buyers
Think of your store’s design as its digital curb appeal. It’s the very first thing a potential customer sees, and it can either draw them in or send them packing before they even see a single product. When you set up a Shopify store, you’re not just uploading a product catalog—you're building an entire shopping experience that has to earn trust and gently guide people toward the checkout.
You get about 50 milliseconds to make a good first impression. That’s it. In that blink of an eye, a visitor decides if they like your site, and that gut reaction is almost entirely based on design. A clean, professional layout immediately signals that you’re a legitimate business, making people feel much more secure about pulling out their credit cards.
Choosing Your Shopify Theme
Your journey into design starts at the Shopify Theme Store. It’s packed with options, both free and paid, and finding the right one comes down to your budget, your brand’s personality, and what you’re selling.
For anyone just starting out, I always suggest looking at the free themes first. Options like Dawn or Sense are built by Shopify’s own team, so you know they’re solid. They’re fully mobile-responsive right out of the box and have all the core features you need to get your first sales. It’s the perfect way to learn the ropes without spending a dime.
Premium themes, which usually run between $180 and $350, are the next step up. They often come loaded with more advanced features like mega menus for large inventories, slick product filtering, or unique layouts that help you break away from the standard look. For example, a fashion store might invest in a theme that supports a ultimate guide to virtual dressing rooms to boost conversions.
When you're browsing themes, keep these points in mind:
- Catalog Size: Is your store built around one hero product, or will you have thousands of SKUs? Some themes are designed for simplicity, others for massive, complex inventories.
- Your Niche: Pay attention to the theme demos. If you sell home goods, look for demos that showcase similar products. It makes it so much easier to visualize your own items in that layout.
- Built-in Features: Do you absolutely need color swatches, a quick-add-to-cart button, or an option for in-store pickup? Checking the theme’s feature list can save you from having to buy expensive apps down the road.
Here’s a classic rookie mistake: falling in love with a theme because of the stunning professional photos in its demo. You have to remember you’ll be swapping those out for your own images. Ignore the beautiful placeholder content and focus on the layout, features, and how a customer would actually navigate the site.
Customizing Your Store's Look and Feel
Once you’ve landed on a theme, it’s time to make it yours. This is where the Shopify theme editor comes in—it’s a simple drag-and-drop tool that lets you customize everything without needing to know any code.
First things first, upload your logo. Make sure it's a high-quality file, as this is a central piece of your brand. Next, dial in your brand colors and fonts. Consistency is everything. Using the same color palette and typography everywhere creates a cohesive, professional vibe that builds subconscious trust.
Think of your homepage as your digital welcome mat. It has to be engaging and incredibly easy to understand. A solid homepage almost always has these four elements:
- A Hero Section: This is your big, bold statement—usually a high-quality banner image and a headline that tells people exactly what you sell.
- A Clear Call-to-Action (CTA): A button that says "Shop Now" or "Explore The Collection" leaves no doubt about what to do next.
- Featured Products: Don't make people dig for the good stuff. Show off your best-sellers or new arrivals right away.
- Social Proof: A few customer testimonials or five-star reviews can do wonders for building instant credibility.
Building Essential Pages for Credibility
A store that’s just a collection of product pages feels empty and, frankly, a bit sketchy. To look like a real, trustworthy business, you need to build out a few key informational pages. This is a non-negotiable step. These pages answer customer questions and give them the confidence to buy from you.
Before you even think about launching, make sure you have these pages built:
- About Us: This is your chance to connect with customers. Tell them your story. Who are you? Why did you start this business?
- Contact Page: Make it dead simple for customers to reach you. Include an email, a contact form, and a phone number or physical address if you have one.
- Policy Pages: Don't skip the legal stuff. Shopify gives you templates for your Refund Policy, Privacy Policy, and Terms of Service. Use them. They create a solid legal foundation for your store.
For a deeper look at the nuts and bolts of storefront creation, our guide on how to design a Shopify store covers more advanced strategies. Getting these pages right, combined with a thoughtfully customized theme, is what elevates your site from a basic template to a trusted brand.
How to Add and Organize Your Products for Sales
A killer store design might get people in the door, but your product pages are where the real magic needs to happen. This is the moment a casual browser decides to become a paying customer. Honestly, when you're figuring out how to set up a Shopify store, mastering your product pages is what separates a pretty-but-unprofitable site from a genuine business.
Let’s get your first product listed and start building a catalog that actually sells.
One of the great things about Shopify is its flexibility. You don't need a massive catalog to get started. In fact, a surprising 27.2% of stores sell between just one and nine products. With a typical conversion rate hovering around 1.4% to 2%, Shopify already gives you a decent starting point. A fantastic product page can easily push that number higher. You can dig into more stats like these over at Shopify store performance on Store Leads.
Crafting Your First Product Listing
Alright, let's get our hands dirty. In your Shopify admin, head over to Products > Add product. You'll see a form, and while it looks simple, every single field plays a part in convincing someone to buy.
Your product title is the first thing people read. It needs to be clear, descriptive, and packed with keywords your ideal customer would search for. "Blue T-Shirt" is okay, I guess. But "Men's Classic Crewneck T-Shirt - Navy Blue" is a hundred times better because it instantly answers several questions.
Next up, the description. This is your sales pitch. Forget long, dense paragraphs. Use short sentences and bullet points to call out the benefits and features. Don't just list specs; tell a story. Instead of just saying "100% cotton," try something like, "Made from ultra-soft, breathable 100% cotton for all-day comfort." See the difference?
The Power of High-Quality Product Images
I can't stress this enough: your photos have to do all the heavy lifting. Since your customers can't physically pick up or touch your product, the images you use are everything. They build trust and create that "I need this" feeling.
Here are a few quick tips for photos that actually sell:
- Go high-res: Blurry photos scream unprofessional. You want crisp, clear images that let people zoom in and see the details.
- Show every angle: Give them the full tour—front, back, side, and close-ups of any unique textures or features.
- Use lifestyle shots: Show your product in action. If you're selling a coffee mug, show someone happily using it on a cozy morning. It helps customers picture it in their own lives.
One of the best pieces of advice I ever got was to think of my product images as a visual sales team. Each photo should answer a potential question. What's the texture like? How big is it relative to a person? What does it look like from the back? When your images do the talking, you eliminate a ton of buyer hesitation.
Setting Prices and Tracking Inventory
The pricing section is more than just a place to type in a number. The "Compare-at price" field is your best friend when running a sale. If you put a higher price in this box, Shopify will automatically show it crossed out next to your actual, lower price. It's an instant and powerful way to create a sense of value.
Inventory management is also a must to avoid the nightmare of overselling. A Stock Keeping Unit (SKU) is just a unique code you give to each product or variant. It might seem like overkill for a brand new store, but trust me, getting into the habit of using SKUs from day one will save you massive headaches as you grow.
Managing Product Variants
What if your t-shirt comes in different colors and sizes? That's where variants come in. Instead of creating a dozen separate product pages for a red shirt, a blue shirt, and a green shirt, you create one single product with a "Color" option.
When you're setting up variants, you can:
- Give each one a unique price (maybe the XXL shirt costs a bit more).
- Upload a specific image for each variant, so the main photo changes when a customer selects "Red."
- Track inventory for each size and color combo separately.
This makes the shopping experience so much smoother. It lets customers see all their choices in one place, which dramatically cuts down on confusion and makes it easier for them to click "Add to Cart."
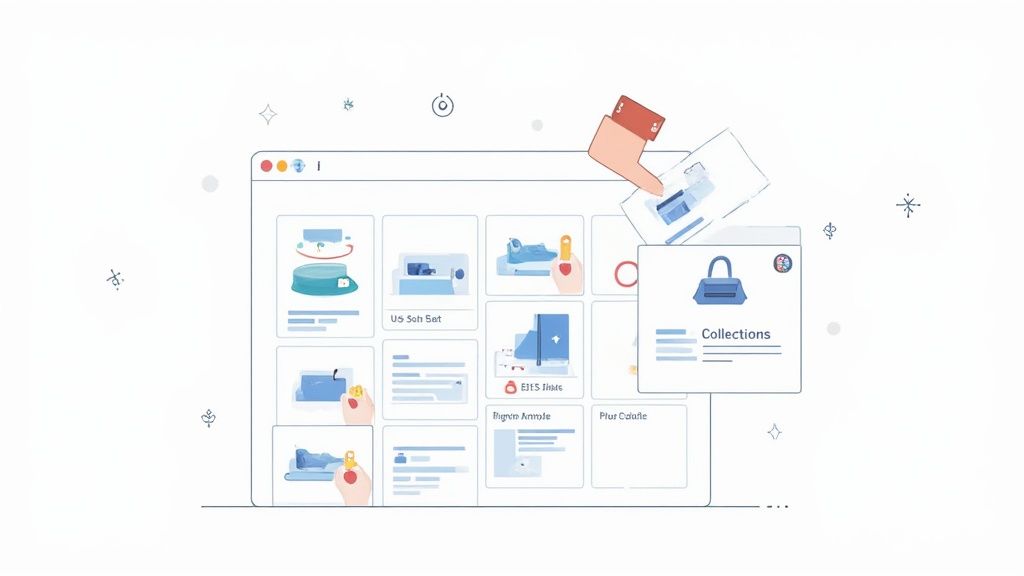
Organizing Products with Collections
Once you have more than a handful of products, you need a way to organize them. In Shopify, this is done with collections. Think of them as the categories or departments of your store.
You can create collections manually, hand-picking which products go into each one. Or, you can get clever and set up automated collections based on rules you define.
For example, you could create an automated "Sale" collection that automatically pulls in any product that has a "compare-at price" set. Or a "New Arrivals" collection that features anything you've added in the last 30 days. This kind of organization makes your store much easier for customers to navigate, which is a huge part of turning a first-time visitor into a repeat buyer.
Getting Payments, Shipping, and Taxes Dialed In
Alright, let's get into the operational heart of your store. A stunning design and amazing products are fantastic, but if you can't get paid, ship your orders, or handle taxes, you don't really have a business.
Nailing these three pillars is what transforms your beautiful storefront into a real, money-making machine. It’s less glamorous than picking a theme, but it's absolutely critical.
Activating Your Payment Gateways
First thing's first: getting paid. You need a secure and simple way for customers to hand over their money, and thankfully, Shopify makes this incredibly easy.
The fastest way to start accepting credit cards is with Shopify Payments. It's built right into the platform, so you don't need to mess around with a third-party merchant account. You can activate it in minutes right from your dashboard, and the rates are competitive.
But don’t just stop there. Offering a few different payment options is a classic move to reduce abandoned carts. Think about who you're selling to. Younger shoppers almost expect to see digital wallets like Apple Pay or Google Pay, which come standard with Shopify Payments.
I also strongly recommend enabling a trusted gateway like PayPal. For new visitors who are a little hesitant to type their credit card info into a brand-new site, that familiar blue button can make all the difference.
Here are the essentials to consider:
- Shopify Payments: The all-in-one choice for major credit cards, Apple Pay, and Google Pay.
- PayPal Express Checkout: A globally recognized name that lets people pay without creating an account on your store.
- Third-party providers: Depending on where you sell, look into popular local payment methods that your target market uses daily.
I once worked with a new store owner who couldn't figure out why their conversion rate was so low, despite having great products. We discovered they had only activated manual bank transfers, a slow and cumbersome option. The moment they enabled Shopify Payments and PayPal, their sales jumped by over 40% in the first week. Never underestimate the power of making it easy to pay.
Configuring Your Shipping Strategy
Shipping can make or break a sale. In fact, surprise shipping costs are one of the top reasons people abandon their carts at checkout. Your goal is to find that sweet spot—a strategy that feels fair to customers but doesn't sink your profit margins.
You’ll start by setting up shipping zones, which are just the geographic areas you're willing to ship to. You might have one zone for your own country and another for international orders, for example.
With your zones defined, it's time to create the actual shipping rates. Shopify gives you plenty of flexibility.
- Flat-Rate Shipping: This is the simplest method. You charge one fixed price for every order in a zone. For example, a flat $5 for all domestic orders. It's predictable for both you and the customer.
- Free Shipping: This is a marketing powerhouse. You can offer it on everything, or, more strategically, set a minimum spend like "Free Shipping on Orders Over $75." It's a fantastic way to nudge your average order value higher.
- Carrier-Calculated Rates: This pulls live rates directly from carriers like USPS, UPS, or DHL. The cost is calculated at checkout based on the package's weight, size, and the customer's address. It's the most accurate way to charge for shipping, but it does require the Advanced Shopify plan or higher.
This topic can get pretty deep. For a complete walkthrough, check out our detailed guide on how to set up shipping in Shopify to explore more advanced tactics.
Handling Sales Taxes Correctly
Taxes can feel like a monster, but Shopify’s built-in tools do a lot of the heavy lifting. For most merchants in the US, Canada, and the EU, Shopify can automatically calculate the right sales tax at checkout.
To set this up, head over to Settings > Taxes and duties. You’ll tell Shopify where your business is based, and it will apply the default tax rates for your region.
The key thing to understand is your nexus—that’s just a legal term for having a commercial connection to a state. If you have a physical presence (like an office or warehouse) or hit a certain sales volume in a state, you're generally required to register and collect sales tax there.
Once you’re registered with a tax authority, you simply add that registration to your Shopify tax settings. From then on, Shopify takes over and applies the correct tax to orders from customers in that state.
Just remember, while Shopify automates the calculation, you're still responsible for registering with the right agencies and actually remitting the taxes you collect. I always recommend chatting with a tax professional to make sure you're fully compliant. A little bit of diligence now can save you a world of headaches down the road.
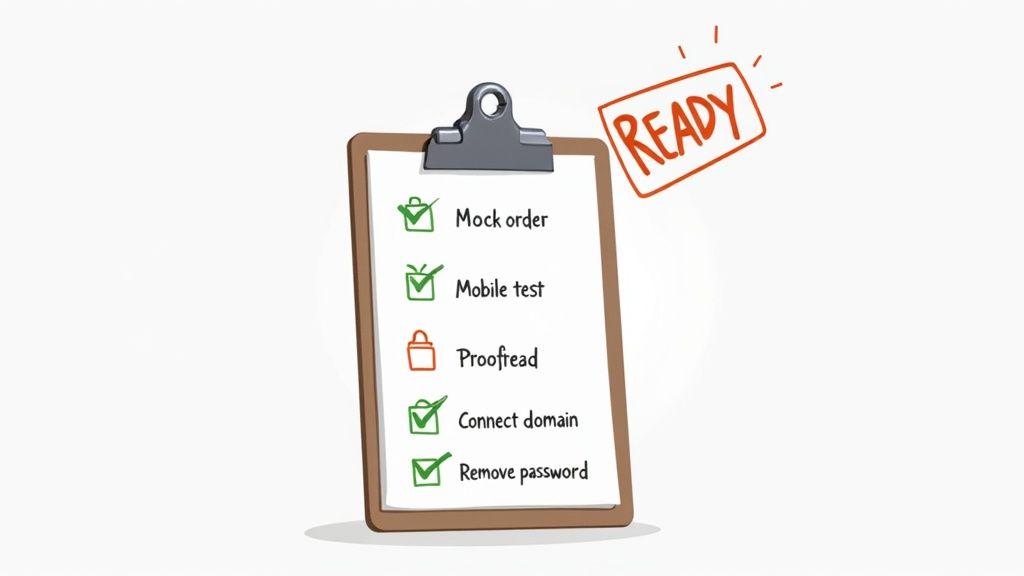
You're in the home stretch. Your theme looks sharp, your products are loaded, and the settings are dialed in. Before you flip the switch and tell the world you're open for business, it's incredibly wise to pause for one last, methodical quality check.
This isn't just about dotting i's and crossing t's; it's about safeguarding your brand's reputation from the very first visitor.
Catching a broken link, a glaring typo, or a checkout glitch before a real customer does is absolutely crucial for building trust. Think of this pre-launch review as the final dress rehearsal before opening night—it ensures the customer experience is as smooth as you envisioned, preventing frustration and lost sales right out of the gate.
Run a Real-World Test Order
The single most valuable check you can perform is to walk through the entire buying process exactly as a customer would. Don't just click "Add to Cart" and assume everything's fine. You need to simulate a complete transaction from start to finish.
Shopify has a handy feature called the Bogus Gateway that lets you process a test order without charging a real credit card. It’s a lifesaver. As you go through your mock purchase, keep an eye on these specifics:
- Adding to Cart: Does it work for all products? What about variants like different sizes or colors?
- Checkout Flow: Go through every step. Enter test shipping details and use the Bogus Gateway for payment.
- Shipping Rates: Do the correct shipping rates pop up for your test address? If you have rules for different zones, test them.
- Discount Codes: If you've set up any launch-day promotions, test one to make sure it applies the discount correctly.
- Order Confirmation: After "placing" the order, ensure you land on the confirmation page and, just as importantly, that you receive the automated order confirmation email.
A classic rookie mistake is only testing on a desktop. I've seen stores where a pop-up completely blocked the mobile checkout button, effectively killing all sales from phone users. Always, always test your checkout flow on both a desktop and a mobile device to catch these kinds of responsiveness issues.
Polish and Proofread Everything
Now it’s time to put on your editor hat. Scour every single piece of text on your site, because small errors can make a big, negative impression.
Work through this list methodically:
- Product Pages: Read every title and description aloud. Are there spelling mistakes? Are the prices and images correct for each variant?
- Static Pages: Proofread your "About Us," "Contact," and all your policy pages (Privacy, Shipping, Returns) for clarity and typos.
- Navigation and Links: This is a big one. Click every single link in your main menu, your footer, and any links within your page content. A broken link is a frustrating dead end for a potential customer.
I've put together a simple checklist to help you track this final review. It’s a good way to make sure nothing slips through the cracks when you're eager to launch.
Final Pre-Launch Review
Going through this table ensures you’ve covered all the critical touchpoints before you welcome your first real customer.
Connect Your Custom Domain
Nothing screams "professional" more than a custom domain. If you've been building your store on the default your-store-name.myshopify.com URL, now is the time to switch over to your branded yourstore.com address.
You can buy a new domain directly through Shopify or connect one you already own from a registrar like GoDaddy or Namecheap. This is a non-negotiable step for brand identity and building customer trust.
Set Up Basic Analytics
Here's a tip: you can't improve what you don't measure. Setting up Google Analytics 4 (GA4) from day one is the best free way to start tracking crucial data like page views, traffic sources, and user behavior. This baseline data will become invaluable as you start making decisions about marketing and store improvements.
The scale of Shopify is immense, with an ecosystem that saw 675 million buyers in the last year alone. To tap into even a sliver of that market, you need to understand your traffic, and GA4 is the industry standard for doing just that. For more on Shopify's scale, check out this in-depth overview on Coalition Technologies.
Flip the Switch and Go Live
This is the moment you've been waiting for. By default, your new Shopify store is password-protected. Once you've double-checked everything on your list and you're confident it's all working perfectly, it's time to take down the "coming soon" sign.
In your Shopify admin, head to Online Store > Preferences. Scroll down to the "Password protection" section and simply uncheck the box.
Hit save. That's it. Your store is officially open for business. Congratulations
Got Questions About Setting Up Shopify?
As you start figuring out how to set up your Shopify store, it's totally normal for questions to pop up. The journey from a great idea to a live store is paved with a ton of small decisions, and it’s easy to get hung up on the details.
I get asked these same questions all the time. Let's clear up some of the most common hurdles new store owners face so you can move forward with confidence.
What’s the Real Cost to Get a Shopify Store Running?
Honestly, your initial investment can be surprisingly small. The main required cost is just your Shopify subscription, which starts at $29 a month. After that, a few other things might come into play.
A custom domain name is a non-negotiable for looking professional, and that'll run you about $15 per year. While there are thousands of gorgeous premium themes out there (usually a one-time cost of $180 to $350), you absolutely don't need one to get started. Shopify's free themes, like Dawn, are fantastic and packed with features. You can always add paid apps for extra functionality later, but most new stores do just fine without them.
You can launch a professional, fully functional store for under $50. That covers your first month's Shopify plan and a custom domain. Don't let the fear of huge startup costs hold you back—the platform is built to be budget-friendly.
Do I Need to Be a Tech Whiz to Build My Store?
Absolutely not. Shopify was literally built for people who don't know the first thing about code or web design. If you can handle everyday computer tasks, you've got all the technical skill you need.
The whole platform is designed around a simple dashboard and a visual, drag-and-drop theme editor. Every single step in this guide, from picking a theme to adding products and setting up payments, is done without touching a line of code. It’s all just clicking, typing, and uploading.
How Long Does It Actually Take to Launch?
This is one of those "it depends" answers, but it really boils down to how prepared you are. If you have your product photos, descriptions, and business info ready to go, you could realistically get a polished store live in a single weekend. I've seen many entrepreneurs launch in just a few focused hours.
Now, if you're dealing with a huge, complex inventory or want to do a lot of custom work on your theme, it might take a week or more. The main thing to remember is that Shopify is engineered for speed. It gets the technical junk out of the way so you can focus on what matters: selling your products.
Can I Use My Own Domain Name?
Yes, and you absolutely should. Using a custom domain like yourbrand.com instead of the default yourbrand.myshopify.com is a critical step for building a trustworthy brand. It’s a small detail that makes a massive difference in how customers see your business.
You have two easy ways to do this:
- Buy a domain through Shopify: This is the simplest route. You can search for and purchase your domain right from the Shopify dashboard, and it connects to your store automatically. No fuss.
- Connect a domain you already own: If you've already bought a domain from a registrar like GoDaddy or Namecheap, you can connect it in a few minutes. Shopify gives you clear, step-by-step instructions that usually just involve changing a couple of settings in your domain provider's account.
Ready to turn your idea into a thriving online store? The team at ECORN specializes in helping businesses build, optimize, and scale their Shopify presence. Whether you need expert design, development, or conversion rate optimization, we have the expertise to make your ecommerce vision a reality. Get in touch with a Shopify expert today and start your journey to success.


Boost Sales: Ecommerce Payment Processing Guide 2026
Unified Commerce Platform: Benefits, KPIs & Shopify Guide
How to Reduce Bounce Rate eCommerce: Your 2026 Guide
Shopify API Integration: A Practical End-to-End Guide

How to Implement Data Governance: A 2026 Guide
Shopify Store Development Cost: A 2026 Breakdown
What Is Server Side Tracking: The Shopify Guide 2026
Marketing Automation Workflows: A Shopify Guide for 2026

Shopify: How to Reduce Technical Debt

Shopify UX Design Change: A Playbook for Growth
User Generated Content Strategy: Shopify Playbook

Shopify Pause and Build Plan Cost: A Complete 2026 Guide
Compare at Price on Shopify: A Complete Guide for 2026
Where Can I Sell My Prints? 10 Best Platforms for 2026
Shopify Order Management System: The Ultimate Guide 2026
What Is Marketing Attribution? an eCommerce Guide for 2026
10 Best Black Friday Sales Sheets for 2026

Discover the Top Social Media Marketing Agencies For
Consumer Confidence Definition for eCommerce in 2026
What Is Social Commerce? Your 2026 Guide to Boosting Sales
A Social Ad Campaign Playbook for eCommerce Growth
7 Best FAQ Page Examples for SaaS & eCommerce

Market Research in Fashion Industry: A Guide for Shopify

Shopify Migration Services: Expert Guide for 2026
Mastering FB Retargeting Ads for Shopify in 2026
What Is Omnichannel Ecommerce

Master Your Shopify Plus Migration: The 2026 Guide
Shopify Integration Services: A Merchant's 2026 Guide
Shopify Collection Description: A Guide to SEO & Sales
Shopify Plus Contact: Reach Sales & Support Effectively

Top Luxury Shopify Stores: Design & UX Strategies
How to Improve Customer Experience: A Shopify Roadmap

Creative Facebook Ads: 10 Examples for Shopify Brands

Remarketing with Facebook Ads: A Shopify Guide for 2026

SEO Linking Strategies for Shopify Stores
Top 7 Statistics YouTube Channels for eCommerce in 2026

Hiring Shopify Plus Designers: A Founder's Guide

Shopify Product Variation: Master Your Variants for 2026

Leverage Ai Solutions Brands: Your 2026 Shopify Growth Guide
Filters in Shopify: A Guide for Growing Brands

Shopify Plus Developer: A Guide for Growing Brands

When Does Black Friday Online Start? A 2026 Guide
Black Friday Email Marketing: Shopify & Klaviyo Guide

Polaris Design System: The Complete Shopify Guide

How to Hire a Consultant Email Marketing Expert

What Is Q4? A Shopify Merchant's Guide to Peak Season

Marketing Organization Structure for eCommerce Growth

Top Account-Based Marketing Agency Guide for 2026

7 Remarketing Ad Examples for Your 2026 Campaigns

AI Retail Solutions: Boost Your Shopify Store

Migrate to Shopify: The Definitive 2026 Guide
Shopify Authentication App: A Guide for Secure Stores

Why Strategic Marketing Is Important for Growth in 2026

How to Create a Size Chart in Shopify: 2026 Guide

Shopify Themes for Jewelry: The Definitive 2026 Guide

Minimal Shopify Templates: Faster, Higher-Converting Stores
Maximize Profit: Shopify CC Fees 2026 Guide

Best Shopify Apps for Beginners in 2026

How to Improve Online Shopping Experience in 2026

Shopify Design and Development Services: A 2026 Guide

Small Business Social Media Marketing Agency: A Hiring Guide
Bulk Edit Shopify: A Guide to Save Hours on Store Updates

2026 Trends in Food and Beverage Industry

Post Purchase Survey Guide for Shopify Stores

How to Build an Ecommerce Brand in 2026
Conversion Rate Optimization for Ecommerce: Maximize Profit
How to Use Customer Data to Increase Sales: A Guide

Shopify for Enterprise: The 2026 Deep Dive Guide

Email Marketing Agencies: The Guide for Shopify Brands
Boost Sales With The Right Shipping Shopify App

Your Guide to the Shopify Site Map

7 Headless Commerce Examples for 2026

Mastering Trends in Cosmetic Industry for 2026
Transfer Shopify to BigCommerce The Complete 2026 Playbook

What Is Shopify Collective? Your 2026 Guide to Success
Unlock Shopify Growth with Site Link SEO

Integrating Shopify and WordPress A Complete Guide for 2026

Naming a Clothing Store: A Shopify Founder's Playbook

Guide to buying shopify store in 2026

Buying shopify store: Buying a Shopify Store: Invest Wisely

Food & Beverage Marketing: A Complete Guide for 2026
Facebook Ads Agency: A Shopify Brand's Hiring Guide

Shopify Apparel Stores: A 2026 Launch & Scale Guide
How to Deactivate Shopify Store: The 2026 Guide

Shopify and Square: The 2026 Ultimate Comparison

Your Guide to Beauty Products Ecommerce

A Guide to Marketing for Beauty Brands in 2026
Your Guide to Facebook Black Friday Ads
Facebook Ad Ecommerce for Shopify Growth

Iconography Web Design The Definitive Guide for Shopify Stores

A Modern Backlinks SEO Strategy for Shopify Stores
How to Launch an Online Store: A Step-by-Step Success Guide
Optimize Shopify Store: Master Performance in 2026
Successful Migration for Shopify: Protect SEO & Grow

Maximize Traffic & Sales: Get Your Free Website Audit Report
Master the Best Ads Facebook Formats for eCommerce Success

How to Find the Best Ecommerce Agency Near Me in 2026

10 Crucial White Hat Techniques SEO for Shopify in 2026
How to Reduce Returns and Boost Profits in Your eCommerce Store
What Is Ecommerce Personalization A Guide to Unlocking Growth


newsletter in your inbox