Getting your shipping sorted out on Shopify is more than just a box-ticking exercise. It's about getting into the nitty-gritty of shipping zones, building out shipping profiles for your different products, and picking a rate strategy that actually works for your business—whether that's simple flat rates, tiered pricing, or live carrier calculations.
This isn't just some technical task to rush through. Your shipping setup is a massive part of your marketing and customer service, and it has a direct line to your sales and profit margins.
Why Your Shipping Strategy Matters
Before you even click into the settings in your Shopify admin, take a step back. Your shipping strategy is one of the most powerful levers you can pull for your store's success. It really does touch everything, from building customer trust and lowering abandoned carts to protecting your bottom line. I've seen it time and time again: merchants who treat shipping as a core part of their business plan from day one are the ones who thrive.
The numbers don't lie. Unexpected shipping costs are the number one killer of conversions. Think about it—how many times have you bailed on a purchase when you saw the final shipping fee? A recent study showed that while around 70% of online shoppers abandon their carts, a staggering 48% of them point to high shipping costs as the reason.
That statistic alone should be a massive signal for anyone selling on Shopify. Fine-tuning your shipping is one of the quickest ways to give your conversion rate a serious boost. If you're interested in diving deeper, it's worth exploring the key Shopify shipping statistics out there.
Key Concepts to Grasp First
To make smart, strategic moves, you first need to get comfortable with the core building blocks inside Shopify's shipping settings. These are the tools you'll use to construct your entire strategy.
- Shipping Profiles: Think of these as rulebooks for specific types of products. You might have a "General" profile for most of your inventory, but a separate "Heavy Items" profile for something like furniture. Each profile can have its own unique rates, which is crucial for preventing you from losing money on bulky or awkward shipments.
- Shipping Zones: These are simply the geographic areas you ship to. You can create different zones for your own country, continent, and international customers. This allows you to set fair and accurate rates for each region instead of trying to make one price fit all.
- Shipping Rates: This is the part the customer sees—what you actually charge them. Your options here are pretty flexible, from dead-simple flat rates to dynamic, real-time prices pulled directly from carriers like USPS or UPS.
By really getting a handle on these three elements, you graduate from just "getting products out the door" to building a shipping experience that actually backs up your brand. It’s about transforming a potential point of friction into a genuine tool that builds loyalty and, just as importantly, protects your profit.
At the end of the day, a well-thought-out approach to shipping gives your customers the transparency they expect and gives your business the financial control it needs to grow.
Building Your Foundation with Shipping Profiles and Zones

Alright, theory is great, but now it's time to get your hands dirty inside your Shopify store. The first real, practical move is to organize your products and customers in a way that makes sense. Shopify gives us two fantastic tools for this: shipping profiles and shipping zones.
Think of shipping profiles as buckets you can put your products into. By default, Shopify just dumps everything into a single "General" profile. If you only sell one type of product—say, the same size t-shirt—that's fine. But most stores have a mix.
Imagine you're running a clothing store. You've got lightweight t-shirts, bulky winter coats, and maybe some fragile sunglasses. If they're all in one profile, you have a problem. You’ll either overcharge for the t-shirt's shipping or end up eating the cost to ship that heavy coat. Neither is a good look for your bottom line.
The big idea here is simple: Group similar products together so you can assign them their own specific, accurate shipping rates. This is how you stop losing money on heavy items or scaring off customers with high shipping costs on small ones.
Creating Smart Shipping Profiles
This is where you start to take back control. Head over to Settings > Shipping and delivery in your Shopify admin. You’ll see that "General" profile sitting there, along with a button to "Create new profile." This is your new best friend.
Let's say you sell handmade ceramics. You could immediately create two profiles that make a world of difference:
- Standard Goods: This is for your smaller, tougher items. Think mugs and small plates that are easy to pack and don't cost a fortune to send.
- Fragile & Heavy Goods: This bucket is specifically for your large, delicate vases or big serving platters. These need special packaging, more padding, and will absolutely cost more to ship safely.
Once you have these separate profiles, you can set completely different shipping rules and rates for each. The customer buying a single mug sees a fair, low shipping cost. The person ordering that huge, delicate vase gets a quote that actually covers your real-world expenses. It’s a win-win.
Defining Your Shipping Zones
With your product profiles set, the next layer is creating shipping zones inside each one. A shipping zone is just a group of states, provinces, or countries that you want to share the same shipping rate. It's how you'll charge a customer in your own city differently than one across the globe.
Working within your "Standard Goods" profile from our ceramics example, you might set up a few zones:
- Domestic Zone: This would include all the states or provinces in your home country.
- North America Zone: For a U.S. store, this could be Canada and Mexico.
- International Zone: A classic "Rest of the World" option for every other country you're willing to ship to.
For each of these zones, you then add the actual shipping rates—we'll get to that part next. This logical structure is what ensures a customer down the street sees a local delivery option, while a customer overseas sees an international rate.
To give you a clearer picture, here’s how a growing store might organize its profiles.
Sample Shipping Profiles for a Growing Store
This table provides a few real-world examples of how you can start grouping products into different shipping profiles based on their unique characteristics.
Taking the time to get this foundation of profiles and zones dialed in is probably the single most important part of setting up Shopify shipping. It prevents painful, costly mistakes, gives your customers total clarity at checkout, and builds a system that can actually grow with your business instead of holding it back.
Alright, you've got your shipping profiles and zones sorted. Now comes the part that your customers really care about: "How much is it going to cost to ship this?"
This isn't just a number; it's a critical piece of your conversion puzzle. Choosing your shipping rates is a balancing act. You need to offer something appealing enough to get customers to click "buy" without completely eating away at your profit margins.
Shopify gives you a few powerful ways to handle this. Let's walk through them to figure out what makes the most sense for your store.
Flat Rate and Tiered Shipping
The simplest, and often most effective, way to go is flat-rate shipping. It's exactly what it sounds like: you charge one single, fixed price for shipping to a specific zone. Maybe that's a flat $5 for all domestic orders. The beauty of this approach is its transparency. There are no surprises at checkout, which is a massive win for building customer trust.
You can also get a bit more sophisticated with tiered flat rates. Instead of one price for everything, you create different rates based on what's in the cart. This gives you way more control.
- Price-Based Rates: This is a classic for a reason. You could offer a $10 flat rate for any order under $75, but then offer free shipping on orders over that amount. It's a fantastic incentive to get people to add just one more item to their cart.
- Weight-Based Rates: If you're selling a mix of light and heavy products, this is a lifesaver. You might set up tiers like $5 for orders from 0-1 lb, $10 for 1-5 lbs, and $20 for anything over 5 lbs. This ensures you're not losing your shirt shipping a heavy, low-margin product.
The real power of flat and tiered rates is predictability. Customers know what to expect, and you can create a pricing model that protects your bottom line, especially when your products have a wide range of weights and prices.
Real-Time Carrier-Calculated Rates
For pinpoint accuracy, nothing beats carrier-calculated shipping. This feature plugs your Shopify store directly into major carriers like USPS, UPS, and FedEx. When a customer gets to the checkout, Shopify zips the package details (dimensions, weight, and destination) over to the carrier, which instantly sends back the exact, real-time shipping cost.
This method is gold for building trust. Customers see they're paying the actual cost, not some arbitrary number you came up with. It's also pretty much essential if you have a huge variety of product sizes and weights or if you ship internationally, where costs can swing wildly.
You really can't overstate how important carrier integration is. Just look at the numbers: among Shopify merchants, USPS is the undisputed king, integrated into nearly 264,000 stores. UPS isn't far behind with 201,464 stores, and FedEx is used by 152,146 stores.
How to Add Your Rates
Once you've decided on your strategy, actually adding the rates is pretty straightforward. Inside one of your shipping zones, you'll just click "Add rate" and pick your method.
The best part? You can mix and match. It's common to offer both a flat-rate "Standard Shipping" option and a carrier-calculated "Express Shipping" option in the same zone, giving your customers a choice between cost and speed.
This is the logical flow of the whole process—you define your zones, then you attach the specific rates that make sense for your business and your customers.
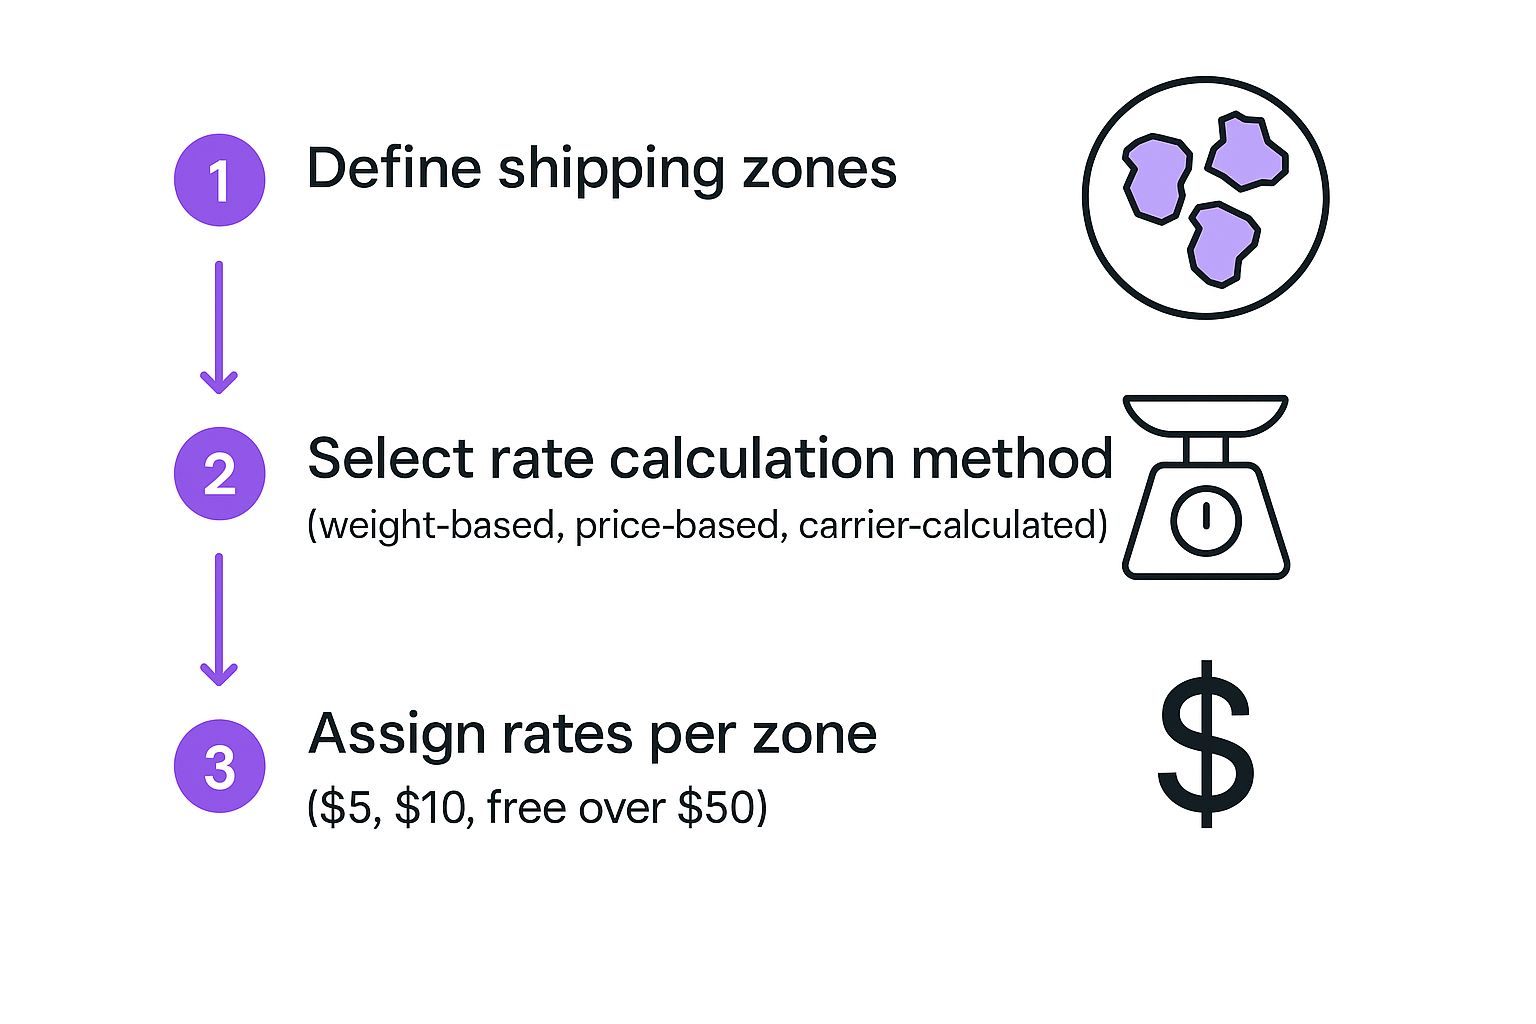
As you can see, the final step is simply assigning the rates you've chosen to each specific zone you've created.
If you want to go even deeper on these strategies, you should check out our complete Shopify shipping rates guide. It covers more advanced scenarios and tips for really fine-tuning your setup. Nailing this part of your Shopify shipping is a huge step toward building a profitable and scalable online store.
Fine-Tuning Carrier and Package Details
When you're setting up shipping on Shopify, getting it mostly right isn't good enough. Accuracy is everything. After you’ve defined your rates, it's time to dial in the small details that so many store owners miss—details that can have a massive impact on your actual profit.
This means connecting your own carrier accounts and, just as importantly, defining the exact packages you use to ship your products.
If you've gone through the trouble of negotiating your own rates with carriers like UPS or FedEx, you absolutely must connect those accounts to your Shopify store. This is how you show your custom, lower rates at checkout instead of just passing on Shopify’s standard discounted rates.
Doing this gives you a serious competitive advantage. You can either pass those savings on to your customers with lower shipping prices or just pocket the difference and pad your margins. It's a critical step that’s often overlooked during the initial rush of setting up a store.
Why Your Custom Packages Matter
Here's probably the most critical—and most forgotten—part of an accurate shipping setup: defining your custom package dimensions. When Shopify calculates a shipping rate, it needs to know the size of the box you're putting the product in. A lot of merchants just skip this and let Shopify default to generic carrier packaging options.
This is a very expensive mistake.
Carriers don't just weigh your package; they use dimensional weight (also called volumetric weight) to figure out the final cost. If the dimensional weight of your box is greater than its actual weight, you get billed for the higher value. End of story.
By taking a few minutes to create default packages in your Shopify settings that perfectly match the boxes you have on your shelves, you ensure the rate calculated at checkout is based on reality. This one simple action protects you from getting hit with unexpected—and expensive—billing adjustments from carriers long after an order has shipped.
Staying Ahead of Carrier Changes
Your shipping setup is never a "set it and forget it" task. Carriers are constantly tweaking their prices, rules, and surcharges, all of which directly hit your bottom line. It's on you to stay informed about these shifts if you want to keep your shipping profitable.
For instance, FedEx's annual shipping rate changes always affect merchants who use carrier-calculated shipping. In the past, the company has increased its late payment fees and changed which ZIP codes are hit with a Delivery Area Surcharge. And don't forget the peak season surcharges they roll out during the holiday rush, which can dramatically inflate your costs during your most important sales months.
Pluginhive has a great breakdown of these kinds of FedEx cost updates that's worth a read.
Being aware of these changes lets you adjust your strategy before it costs you money. You might need to temporarily tweak a flat rate, build in a handling fee, or just communicate potential holiday delays to your customers. Proactive management of these nitty-gritty details is what turns your shipping operation from a cost center into a well-oiled, profitable part of your business.
Streamlining Fulfillment with Shopify Shipping
Getting your rates and zones locked in is a massive step, but the real magic happens when you start handling orders after the sale. This is where Shopify Shipping comes in, turning what can be a tedious, manual chore into a surprisingly smooth part of your day-to-day. Think of it as your built-in command center for buying and printing discounted shipping labels, all without ever leaving your Shopify admin.
Forget the old, clunky process of copying and pasting customer addresses into a carrier’s website. With Shopify Shipping, everything you need for fulfillment is right there with your orders. It’s not just about saving a ton of time; this integration practically eliminates those pesky (and costly) human errors.
Processing a Single Order
Okay, so a new order just popped up. Instead of navigating away from your dashboard, you can simply open that order and hit "Create shipping label." Boom—all the customer’s details are pre-filled. Shopify will even suggest a package type based on the defaults you've already set up.
Your only job is to quickly verify the package weight and dimensions, pick a shipping service (like USPS Ground Advantage or UPS Ground), and buy the label. From there, you can print it on a standard office printer or, even better, a dedicated thermal label printer.
This workflow's secret weapon is the automation. The second you buy that label, Shopify instantly marks the order as fulfilled and fires off a shipping confirmation email to your customer, complete with a tracking number. That single click saves you from a mountain of "Where is my order?" emails.
Fulfilling Multiple Orders with Bulk Actions
Handling orders one by one is fine when things are quiet. But what about when you’re hit with ten, twenty, or even fifty orders at once? This is exactly why bulk fulfillment is a lifesaver for any growing brand.
From your main "Orders" screen, you can check off multiple orders and take action on them all at once.
- Create all your shipping labels in one batch. Shopify guides you through each selected order, letting you confirm weights and services before purchasing all the labels in a single transaction.
- Print all packing slips or labels simultaneously. This sends the entire job to your printer, making it easy to match the right label to the right box and get everything out the door.
This bulk processing feature is a core reason why so many stores can scale without getting totally overwhelmed. It's what allows you to manage a big sales rush from a promotion or holiday without your shipping room descending into chaos. For anyone looking to fine-tune their rate calculations even further, digging into a detailed Shopify shipping calculator guide can add another layer of strategy to this already powerful fulfillment process.
Shopify Shipping Common Questions
Even with the most carefully planned setup, you're bound to run into questions as you get into the rhythm of fulfilling orders. Let's tackle some of the most common hurdles and queries I see from store owners when they're managing their Shopify shipping. The goal here is to give you direct, no-fluff answers so you can solve problems and get back to business.
How Can I Offer Free Shipping on Shopify Without Losing Money?
Ah, the golden question. Free shipping is a powerful marketing tool, but it can absolutely wreck your margins if you're not smart about it.
The most popular—and effective—way to pull this off is by setting a minimum order value. Think "Free shipping on all orders over $75." This little nudge encourages shoppers to add one more thing to their cart, boosting your average order value (AOV) and giving you the cushion to absorb the shipping cost.
Another solid strategy is to just bake the average shipping cost right into your product prices. Dig into your past orders and figure out what you're paying on average to ship a package. Then, you can bump up your product prices slightly across your catalog to cover that expense. The customer sees "free" shipping, but you've protected your profit on every single sale.
What Is the Difference Between Shopify Shipping and a Third-Party App?
This comes up all the time. Think of it like this: Shopify Shipping is the fantastic, built-in tool that comes with your store. It lets you buy and print discounted labels from the big carriers like USPS, UPS, and DHL right from your Shopify admin. For most new and growing stores with pretty straightforward shipping, it's perfect.
Third-party apps, like Better Shipping or PluginHive, are what you look for when your needs get a lot more complex. You’re ready to explore a third-party app when you find yourself needing highly specific, rule-based shipping logic.
You might need a third-party app if you have to:
- Set totally unique shipping rates for every single product.
- Build complex rules based on specific ZIP or postal codes.
- Offer different rates based on the exact mix of items in a cart.
- Juggle fulfillment from multiple warehouses.
My advice? Start with the native Shopify Shipping. It's powerful and cost-effective. Only start paying for an app when you've truly outgrown what Shopify offers out of the box.
Can I Set Different Shipping Rates for Different Products?
Absolutely, and you definitely should if you want accurate pricing. The key to this is using Shipping Profiles.
By default, Shopify dumps all of your products into a single "General" shipping profile, which has one set of rates. To set different rates, you just need to create new profiles for specific groups of products.
For instance, a home goods store could have a "Heavy Items" profile for furniture and a "Fragile Items" profile for its glassware. Each of these profiles gets its own dedicated shipping zones and rate structures, completely separate from your other products. This is how you make sure you’re charging the right amount for heavy or special-care items without scaring off customers buying a small, lightweight product.
My Carrier-Calculated Rates Seem Wrong. What Should I Check?
This is a super common and frustrating issue, but the fix is usually hiding in one of three places.
First, go back and double-check the product weights and dimensions in your product listings. You'd be amazed how even a small inaccuracy can throw the whole calculation off.
Next, take a look at your default package settings under Settings > Shipping and delivery. The dimensions you have saved there need to match the boxes you're actually using. Carriers use this for volumetric weight calculations, so it has to be precise.
Finally, confirm your "Shipping from" address is 100% accurate. This is the starting point for every single rate calculation, so a typo or an old address will mess everything up. In my experience, fixing a small error in one of these three areas solves the problem nine times out of ten.
At ECORN, we turn these kinds of complex Shopify challenges into simple, profitable solutions for businesses like yours. Whether it’s dialing in your shipping strategy or boosting your store's conversion rates, our team is here to help you scale. Check out our flexible subscription packages and see how we can help you grow at ECORN.


Unified Commerce Platform: Benefits, KPIs & Shopify Guide

How to Reduce Bounce Rate eCommerce: Your 2026 Guide
Shopify API Integration: A Practical End-to-End Guide

How to Implement Data Governance: A 2026 Guide

Shopify Store Development Cost: A 2026 Breakdown
What Is Server Side Tracking: The Shopify Guide 2026

Marketing Automation Workflows: A Shopify Guide for 2026

Shopify: How to Reduce Technical Debt

Shopify UX Design Change: A Playbook for Growth

User Generated Content Strategy: Shopify Playbook

Shopify Pause and Build Plan Cost: A Complete 2026 Guide

Compare at Price on Shopify: A Complete Guide for 2026

Where Can I Sell My Prints? 10 Best Platforms for 2026
Shopify Order Management System: The Ultimate Guide 2026
What Is Marketing Attribution? an eCommerce Guide for 2026

10 Best Black Friday Sales Sheets for 2026

Discover the Top Social Media Marketing Agencies For
Consumer Confidence Definition for eCommerce in 2026

What Is Social Commerce? Your 2026 Guide to Boosting Sales

A Social Ad Campaign Playbook for eCommerce Growth

7 Best FAQ Page Examples for SaaS & eCommerce

Market Research in Fashion Industry: A Guide for Shopify

Shopify Migration Services: Expert Guide for 2026

Mastering FB Retargeting Ads for Shopify in 2026
What Is Omnichannel Ecommerce

Master Your Shopify Plus Migration: The 2026 Guide
Shopify Integration Services: A Merchant's 2026 Guide

Shopify Collection Description: A Guide to SEO & Sales

Shopify Plus Contact: Reach Sales & Support Effectively

Top Luxury Shopify Stores: Design & UX Strategies

How to Improve Customer Experience: A Shopify Roadmap

Creative Facebook Ads: 10 Examples for Shopify Brands

Remarketing with Facebook Ads: A Shopify Guide for 2026

SEO Linking Strategies for Shopify Stores
Top 7 Statistics YouTube Channels for eCommerce in 2026

Hiring Shopify Plus Designers: A Founder's Guide

Shopify Product Variation: Master Your Variants for 2026

Leverage Ai Solutions Brands: Your 2026 Shopify Growth Guide

Filters in Shopify: A Guide for Growing Brands

Shopify Plus Developer: A Guide for Growing Brands

When Does Black Friday Online Start? A 2026 Guide
Black Friday Email Marketing: Shopify & Klaviyo Guide

Polaris Design System: The Complete Shopify Guide

How to Hire a Consultant Email Marketing Expert

What Is Q4? A Shopify Merchant's Guide to Peak Season

Marketing Organization Structure for eCommerce Growth

Top Account-Based Marketing Agency Guide for 2026

7 Remarketing Ad Examples for Your 2026 Campaigns

AI Retail Solutions: Boost Your Shopify Store

Migrate to Shopify: The Definitive 2026 Guide

Shopify Authentication App: A Guide for Secure Stores

Why Strategic Marketing Is Important for Growth in 2026

How to Create a Size Chart in Shopify: 2026 Guide

Shopify Themes for Jewelry: The Definitive 2026 Guide

Minimal Shopify Templates: Faster, Higher-Converting Stores

Maximize Profit: Shopify CC Fees 2026 Guide

Best Shopify Apps for Beginners in 2026

How to Improve Online Shopping Experience in 2026

Shopify Design and Development Services: A 2026 Guide

Small Business Social Media Marketing Agency: A Hiring Guide

Bulk Edit Shopify: A Guide to Save Hours on Store Updates

2026 Trends in Food and Beverage Industry

Post Purchase Survey Guide for Shopify Stores

How to Build an Ecommerce Brand in 2026
Conversion Rate Optimization for Ecommerce: Maximize Profit
How to Use Customer Data to Increase Sales: A Guide

Shopify for Enterprise: The 2026 Deep Dive Guide

Email Marketing Agencies: The Guide for Shopify Brands
Boost Sales With The Right Shipping Shopify App

Your Guide to the Shopify Site Map

7 Headless Commerce Examples for 2026

Mastering Trends in Cosmetic Industry for 2026
Transfer Shopify to BigCommerce The Complete 2026 Playbook

What Is Shopify Collective? Your 2026 Guide to Success

Unlock Shopify Growth with Site Link SEO

Integrating Shopify and WordPress A Complete Guide for 2026

Naming a Clothing Store: A Shopify Founder's Playbook

Guide to buying shopify store in 2026

Buying shopify store: Buying a Shopify Store: Invest Wisely

Food & Beverage Marketing: A Complete Guide for 2026

Facebook Ads Agency: A Shopify Brand's Hiring Guide

Shopify Apparel Stores: A 2026 Launch & Scale Guide

How to Deactivate Shopify Store: The 2026 Guide

Shopify and Square: The 2026 Ultimate Comparison

Your Guide to Beauty Products Ecommerce

A Guide to Marketing for Beauty Brands in 2026

Your Guide to Facebook Black Friday Ads

Facebook Ad Ecommerce for Shopify Growth

Iconography Web Design The Definitive Guide for Shopify Stores

A Modern Backlinks SEO Strategy for Shopify Stores

How to Launch an Online Store: A Step-by-Step Success Guide

Optimize Shopify Store: Master Performance in 2026

Successful Migration for Shopify: Protect SEO & Grow

Maximize Traffic & Sales: Get Your Free Website Audit Report

Master the Best Ads Facebook Formats for eCommerce Success

How to Find the Best Ecommerce Agency Near Me in 2026

10 Crucial White Hat Techniques SEO for Shopify in 2026

How to Reduce Returns and Boost Profits in Your eCommerce Store

What Is Ecommerce Personalization A Guide to Unlocking Growth

Payment gateways in shopify: The Ultimate Guide for Merchants 2026


newsletter in your inbox