
So, you're ready to create a website on Shopify? Fantastic choice. Before you dive headfirst into picking themes and uploading product photos, let's take a step back. The most common mistake I see new entrepreneurs make is jumping into the technical setup without a solid plan.
Building a successful store starts long before you ever click "Sign Up." This initial groundwork is your strategic blueprint, and it ensures every decision you make—from your store's name to your marketing message—is intentional and built for the long haul.
Laying the Foundation for Your Shopify Store
Shopify has become an eCommerce powerhouse for a reason. It’s intuitive enough for a solo founder but robust enough for massive corporations. Its global reach is staggering; as of mid-2025, there are roughly 5.8 million live stores on the platform. The United States alone is home to about 2.67 million of them, which really speaks to its ability to support just about any business model you can dream up.
But with that many stores, you need a clear plan to stand out. The most successful brands don't just sell products; they have a clear mission and know exactly who they're selling to. Defining your business foundation is what separates a short-lived hobby from a thriving, profitable business.
Define Your Core Business Pillars
Let's get specific. Nailing down these core elements will make every other step infinitely easier.
- Find Your Business Niche: Don't just sell "clothing." That's too broad. Instead, focus on something specific, like "sustainably made activewear for yoga enthusiasts." A tight niche makes you the go-to expert and helps you attract a loyal, dedicated audience that feels like you get them.
- Create Your Ideal Customer Profile: Who, exactly, are you selling to? Get detailed here. Give them a name. How old are they? What are their hobbies, their struggles, their online hangouts? This persona becomes your guide for everything—your branding, your ad copy, even the features you add to your store.
- Craft Your Brand Identity and Name: Your store name needs to be memorable, easy to spell, and a reflection of your brand's vibe. Just as importantly, check if the domain name is actually available! Your brand is more than a logo; it's the feeling and emotional connection customers have with your business.
As you're mapping all of this out, it's also a smart time to look into the different startup funding options available. Having a clear financial runway can be a game-changer for your launch and future growth.
A strong brand blueprint is your North Star. Seriously. When you're stuck deciding on a theme or struggling to write a product description, you can always come back to your core mission and ideal customer. It takes all the guesswork out of the equation.
Before we get into the nitty-gritty of the Shopify dashboard, let's quickly review the core components you should have ready. Think of this as your pre-flight checklist.
Shopify Launch Checklist Core Components
This table summarizes the foundational pieces we've just discussed. Having these elements clearly defined will make the actual store-building process smoother and more effective.
Getting these pieces in order first is the single best thing you can do to set yourself up for success. With this foundation in place, you’re ready to start building.
Alright, you've done the strategic work. Now for the fun part: actually building your store. This is where your vision starts to become a reality. We're going to dive right into the Shopify dashboard, sign up, and nail down the core settings that will act as the foundation for your entire business.
Think of it as laying the digital bricks and mortar for your new shop.
Getting started is refreshingly simple. When you first head over to the Shopify website to sign up, you'll be greeted by a clean, straightforward process. They'll ask a few basic questions to get a feel for your business, which helps them tailor the dashboard experience for you from day one.
You’ll see a screen that looks something like this to kick things off.
Shopify usually offers a free trial, which is perfect for getting your hands dirty and exploring the platform without any financial pressure. I always recommend taking full advantage of it.
Choosing the Right Shopify Plan
One of the first big decisions you'll make is which Shopify plan to go with. It's tempting to just pick the cheapest one and call it a day, but that can be shortsighted. You need to think about where you're headed.
- Basic Shopify: This is the go-to for brand-new businesses, especially if you plan on doing some in-person sales. It has everything you need to get off the ground, including two staff accounts and essential reporting.
- Shopify: The most popular plan for a reason. It’s built for growing businesses that are starting to see real traction. The transaction fees are lower, the reporting is more professional, and you get up to five staff accounts.
- Advanced Shopify: This one's for businesses ready to scale. If you're forecasting high-volume sales, the significantly lower transaction fees and advanced reporting tools here are a must. You also get 15 staff accounts and the ability to calculate third-party shipping rates automatically.
Here's my advice: Look at your sales projections. If you expect strong growth within your first six months, starting on the "Shopify" plan could actually save you money in the long run because of the better credit card rates.
Configuring Your Core Store Settings
Once you're logged into your Shopify admin, make a beeline for the "Settings" button in the bottom-left corner. This is your command center. Getting these details right from the very beginning will save you a world of headaches later on.
First up, fill out your Store Details. This is all your official info—legal business name, address, contact details, etc. Don't gloss over this, because this is the information that will show up on customer invoices and in email notifications. Accuracy is non-negotiable.
Next, lock in your Store Currency and Time Zone. These might seem like minor details, but they have a major impact on how your prices are displayed and when your sales data is compiled. If your target market is in the U.S., for example, you absolutely want your currency set to USD.
Pro Tip: Don't put off your legal pages. In the settings, Shopify provides templates for your Refund Policy, Privacy Policy, Terms of Service, and Shipping Policy. These templates are a fantastic starting point, but I always tell my clients to have a legal professional give them a once-over to make sure they're airtight for their specific business.
Setting Up Your Payment Gateways
Let's be real—getting paid is the whole point. You need a seamless way for customers to give you their money securely from the moment you launch.
Shopify makes this incredibly easy with its built-in processor, Shopify Payments. It’s the path of least resistance. You can accept all major credit cards almost immediately after creating your store. The direct integration is a massive plus, which is why around 1.85 million merchants rely on it. The fact that the platform has processed over $1 trillion in cumulative global sales shows just how much trust businesses put in its financial system. You can find more stats on Shopify's massive economic impact on redstagfulfillment.com.
But don't stop there. You should also enable popular third-party gateways. Adding options like PayPal or Amazon Pay can genuinely boost your conversion rate. So many shoppers are logged into these accounts already and prefer the convenience and security of a familiar checkout process. The more preferred payment options you offer, the less friction you create, and the fewer abandoned carts you'll see.
Designing Your Storefront and Adding Products
Alright, with the backend settings dialed in, it’s time for the fun part—designing what your customers will actually see and interact with. Your website's design is your digital handshake, and you only get one chance to make a good first impression. In fact, research shows that a staggering 94% of first impressions are purely design-related. This makes your theme and layout absolutely critical for building trust from the second someone lands on your page.
This is where your brand’s personality really comes to life. Shopify has a massive library of themes that act as the foundation for your store's look and feel. Let's walk through how to pick the right one and then start filling it with products your customers will love.
Choosing and Customizing Your Shopify Theme
Think of your theme as the visual and functional skeleton of your store. It controls everything from the layout and typography to the color palette and overall user experience. In the Shopify Theme Store, you'll find both free and premium options, and each has its own perks.
Free themes, like the popular "Dawn" or "Sense," are fantastic starting points. They are built and fully supported by Shopify, so you know they're mobile-responsive and up-to-date with the latest features. For a new store, they provide all the essential tools you need to look professional without any upfront cost.
Premium themes, on the other hand, often pack a bigger punch right out of the box. They might include advanced features like mega menus, slick filtering options, or unique animation effects. If a premium theme offers specific functionality you need, it can be a smart investment that saves you from having to buy multiple separate apps down the road.
Once you’ve made your choice, the real creative work begins. Head over to Online Store > Themes in your Shopify admin and hit "Customize." This opens up the drag-and-drop editor, where you can:
- Upload your logo and set your favicon (that tiny icon in the browser tab).
- Set your brand colors and fonts to create a consistent, professional look.
- Build your homepage by adding and arranging sections like image banners, featured products, and glowing customer testimonials.
Your homepage is your most valuable piece of digital real estate. Use it to tell your brand's story, highlight your best-sellers, and make your unique value proposition crystal clear within the first few seconds.
If you're looking to go even deeper on creating a high-converting storefront, our guide on how to design a Shopify website is packed with advanced tips and visual strategies.
Crafting High-Converting Product Pages
With your design foundation set, it's time to add your products. This isn't just about uploading a photo and slapping a price on it; it’s about crafting a compelling sales pitch for every single item. A great product page anticipates a customer's questions and gives them all the information they need to click "Add to Cart" with confidence.
From your Shopify admin, navigate to Products > Add product. You'll see a form with several key fields—each one is crucial for both your customers and for getting found on search engines.
Key Elements of a Product Listing
- Product Title: Be clear, descriptive, and sprinkle in relevant keywords. Instead of "Blue Shirt," try something like "Men's Performance Polo Shirt - Navy Blue."
- Product Description: This is your sales copy. Use a mix of short paragraphs and bullet points to highlight the benefits, not just the features. How will this product make your customer's life better?
- High-Quality Media: Your photos and videos are your most powerful sales tools. Period. Show the product from every angle, show it in use, and include lifestyle shots that help customers imagine it in their own lives.
- Pricing and Inventory: Set your price, a "compare at" price if you're running a sale, and turn on inventory tracking. Shopify can automatically hide products when they sell out, saving you from customer service headaches.
Organizing Your Products with Collections
Imagine walking into a department store with no signs or sections—just piles of products everywhere. You'd leave immediately. The same goes for your online store. Collections are Shopify's way of organizing your products into logical groups, making it a breeze for customers to browse and find what they're looking for.
You can create collections based on almost anything:
- Product Type: T-Shirts, Mugs, Hats
- Who it's for: For Him, For Her, For Kids
- Special Themes: The Summer Collection, Holiday Gift Guide, New Arrivals
Shopify gives you two ways to build these collections:
- Manual Collections: You hand-pick every single product that goes into the group. This is perfect for small, curated lists like a "Founder's Favorites" or "Top 10 Best-Sellers."
- Automated Collections: You set the rules, and Shopify does the work. For example, you could automatically create a "Sale" collection for any product with the tag "sale" and a price under $50.
Well-organized collections are the backbone of your store's navigation. Once they're set up, you can link to them from your main menu, helping shoppers move seamlessly through your catalog to find exactly what they need.
Configuring Shipping and Tax Settings
Once your products are looking sharp, it’s time to dial in the logistics that get them from your warehouse to your customer's doorstep. Shipping and tax settings might not feel as exciting as designing your storefront, but they are absolutely non-negotiable for a profitable business.
Get this part wrong, and you could find yourself losing money on every order or, even worse, scaring away customers with unexpected fees at checkout. Let's walk through these settings to make sure your checkout process is smooth, transparent, and built for profit from day one.
Mastering Your Shipping Strategy
Your first order of business is to define your shipping zones. Think of these as the geographic areas you're willing to ship to. You can get as granular as you want—creating different zones for your own country, for neighboring countries, or for the rest of the world. Each zone can have its own unique set of shipping rates.
For example, you might create one zone for the United States, a second for Canada and Mexico, and a third "International" zone for everywhere else. This simple act of segmentation is the bedrock of an organized, scalable shipping system.
With your zones mapped out, the next question is how you'll charge for shipping. There are a few tried-and-true approaches, each with its own pros and cons.
- Flat-Rate Shipping: This is the simplest option. You charge a single, fixed price for shipping on all orders, or on orders that fall within a certain price or weight range. It’s easy for customers to understand (e.g., "$5 flat rate on all U.S. orders").
- Weight-Based Shipping: Here, the shipping cost is calculated based on the total weight of the products in the cart. This is a much fairer method if you sell products of vastly different sizes and weights.
- Carrier-Calculated Shipping: With this method, Shopify connects directly with carriers like USPS, FedEx, or DHL to pull real-time, accurate shipping rates at checkout. It's the most precise way to charge, ensuring you neither overcharge your customers nor undercharge and lose money on postage.
Pro Tip: Shipping is not a "set it and forget it" task. You absolutely must review your rates every few months. Carrier costs are always changing, and what was a profitable rate last quarter might be slowly eating away at your margins today. A quick audit can save you a fortune.
If you're ready to get into the weeds on zones, rates, and profiles, our detailed guide on how to set up shipping on Shopify breaks down every single step.
Deciding on a strategy can feel overwhelming, so I've put together a quick comparison table to help you weigh the options based on what works for most online stores.
Common Shopify Shipping Strategies Compared
Ultimately, the "best" strategy depends entirely on your products, your margins, and your customers. Many successful stores use a hybrid approach, like offering free shipping over a certain threshold combined with carrier-calculated rates for smaller orders.
The Power of Free Shipping
Never, ever underestimate the psychological pull of the word "free." Offering free shipping is easily one of the most powerful marketing tools you have. In fact, study after study shows that unexpected shipping costs are the #1 reason for shopping cart abandonment.
You can roll this out in a few strategic ways:
- Offer free shipping on all orders (just make sure you've built the average shipping cost into your product prices).
- Set a minimum purchase threshold (e.g., "Free shipping on orders over $75"). This is a fantastic way to increase your average order value.
- Run it as a limited-time promotion to create urgency and drive a quick surge in sales.
This is where having accurate product data becomes critical, especially if you're using weight-based rates or trying to calculate shipping costs to bake into your prices.
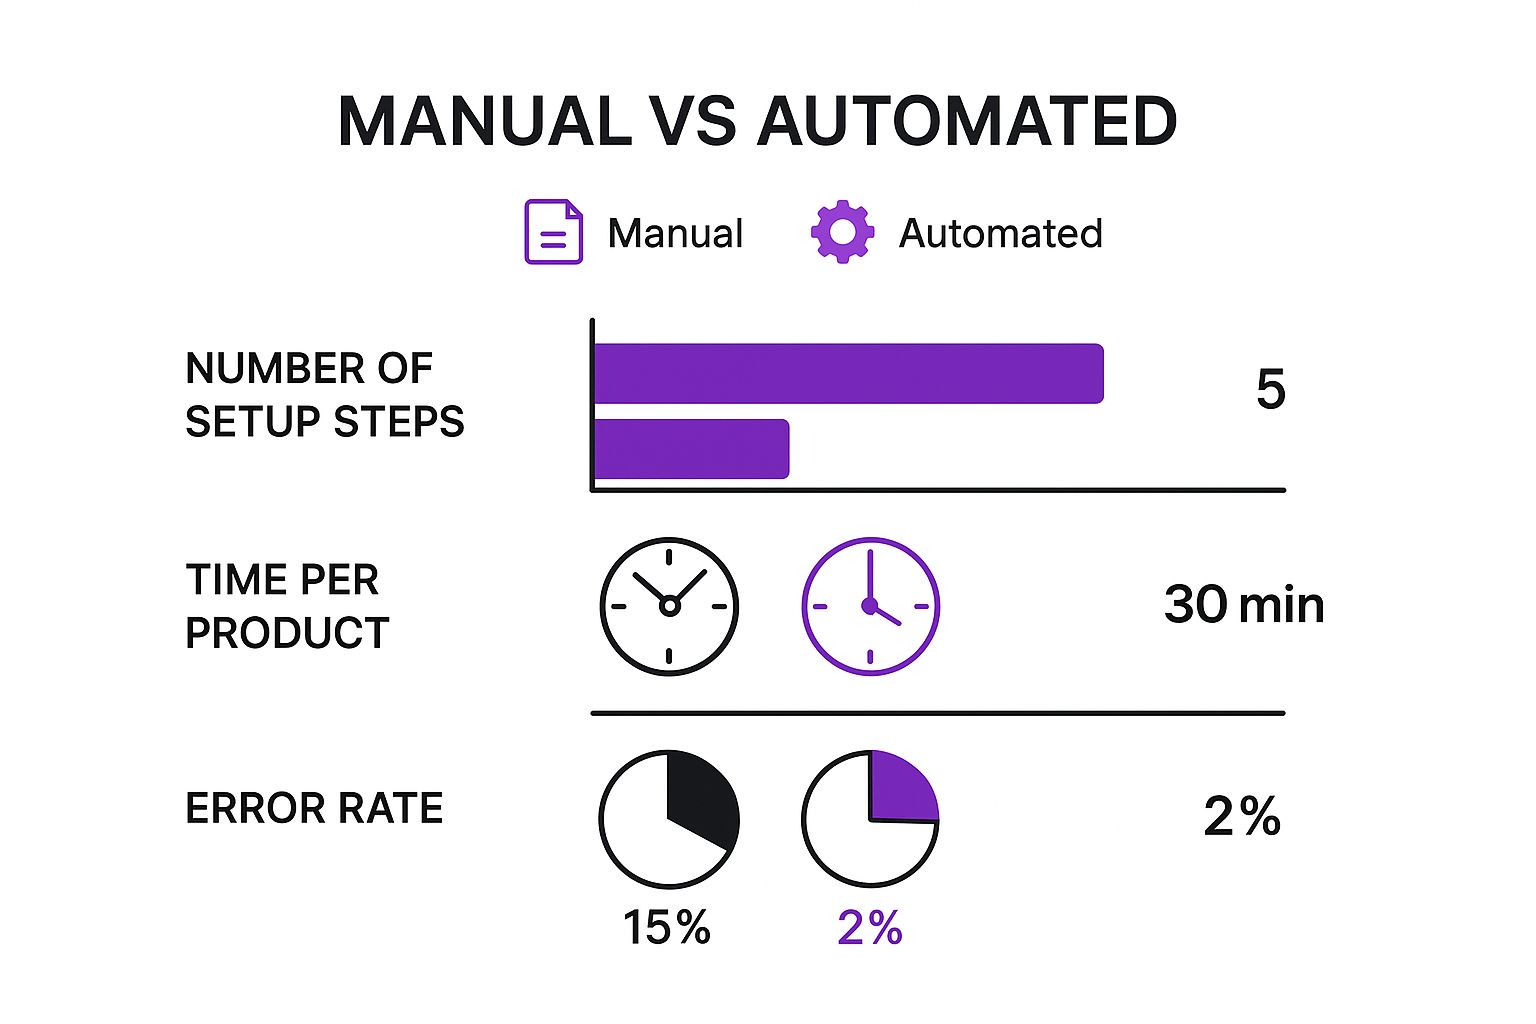
As you can see, automating processes like product data imports drastically reduces setup time and, more importantly, minimizes the chance of costly errors. An incorrect product weight can throw off every single shipping calculation.
Navigating Sales Tax Collection
Taxes can feel like a massive headache, but Shopify really does handle most of the heavy lifting for you. For many store owners, Shopify can automatically calculate and collect the correct sales tax based on your business location and your customer's shipping address.
To get this going, just head to Settings > Taxes and duties. You’ll tell Shopify where you have a "tax nexus"—basically, a business presence that legally requires you to collect sales tax in a particular state or region.
While Shopify's tax engine is powerful, it's not a substitute for professional legal advice. Tax laws are notoriously complex and change all the time. I always recommend consulting with a tax professional to ensure you're fully compliant, especially if you sell internationally or have physical locations in multiple states.
In some scenarios, you might need to make manual tweaks. For instance, certain products like clothing or food are taxed differently in some states. Shopify lets you create tax overrides for specific products or collections to handle these exceptions, giving you precise control over your calculations.
Adding the Final Polish: Essential Apps and Pre-Launch Checks
Your store is designed, your settings are dialed in, and you’re in the home stretch. This final phase is all about bolting on some powerful functionality with apps and running through a meticulous pre-launch audit. Trust me, getting this right is your best defense against those dreaded launch-day headaches and ensures your brand new Shopify site is ready for its big debut.
The Shopify App Store is an absolute goldmine of tools, but it's easy to get overwhelmed. Instead of going down a rabbit hole of endless options, I always recommend clients focus on a handful of essentials that cover the core needs of nearly every new online store.
Must-Have Shopify Apps for a Strong Start
Think of apps as specialized employees who work for you 24/7. They can automate tedious tasks, seriously upgrade the customer experience, and ultimately, help you make more sales. Before you even think about going live, make sure you've got these categories covered.
- Email & SMS Marketing: You absolutely need a direct line to your customers. An app like Klaviyo is the gold standard for a reason. It lets you build your email list, send automated abandoned cart reminders, and create marketing flows that work for you while you sleep.
- Customer Reviews: In ecommerce, social proof is everything. Apps like Loox or Judge.me make it dead simple to collect and display product reviews, often with customer photos. Seeing authentic feedback from real people builds instant trust and can boost conversion rates by over 200%.
- SEO Optimization: While Shopify's built-in SEO is pretty solid, an app gives you an extra edge. A tool like Plug in SEO will scan your store for issues, give you straightforward recommendations, and help you fine-tune titles and descriptions to start climbing the search engine rankings.
Competition on Shopify is no joke. The market is constantly shifting, with the number of active U.S. stores dropping from around 2.72 million in 2024 to 983,610 in 2025. This just goes to show why you need every advantage you can get. Using powerful apps isn't optional; it's crucial for standing out. You can dive deeper into these Shopify store trends on cropink.com.
Your Ultimate Pre-Launch Checklist
Alright, before you flip the switch and remove that password page, it's time for one last, thorough review. Go through this checklist step-by-step. I promise it will save you from embarrassing mistakes and those frantic "oh no" moments after you've already announced your launch.
Pro Tip: Grab a friend or family member who has never seen your website and ask them to run through these checks. A fresh pair of eyes will catch typos and weird usability issues that you've become blind to after staring at your site for weeks.
1. Place a Test Order
This is non-negotiable. It's the most critical check you can do. Use a real credit card or Shopify’s Bogus Gateway to simulate a complete purchase from start to finish. Does the checkout flow feel smooth? Are the correct shipping rates and taxes popping up? Did you get the order confirmation email?
2. Hunt for Broken Links and Typos
Click every single link. I mean it. Check your main navigation, footer links, every button on your product pages, and all of your policy pages. While you're at it, proofread all your content—from the homepage banner to the tiniest product detail. Nothing kills credibility faster than sloppy copy.
3. Verify Mobile Responsiveness
Well over half of your traffic will come from mobile devices. Pull up your store on your phone and a tablet. Does it look good? Is the text easy to read? Can you navigate the menu and complete a purchase without any annoying pinching and zooming?
4. Check All Automated Emails
Your store sends out several automated emails on your behalf. You need to make sure they match your brand voice and have all the right info. Take a look at these key templates:
- Order Confirmation
- Shipping Confirmation
- Abandoned Cart Reminder
5. Confirm Domain and Settings
Last but not least, pop back into your settings. Double-check that your custom domain is connected correctly and set as your primary domain. Give everything one last scan to make sure your store name, contact info, and social media links are all perfect. Once you’ve ticked off these final checks, you’re ready to launch.
Your Top Questions, Answered
Jumping into Shopify for the first time? It's totally normal to have a million questions swirling around. We get it. We've been there.
Let's cut through the noise and tackle some of the most common things we hear from founders just like you. The goal is to clear up any confusion so you can move forward with confidence.
Can I Really Start a Shopify Store with No Money?
Yes, you absolutely can. Shopify gives you a free trial, which is your golden ticket to build out your entire store, load up your products, and tweak the design until it's perfect—all before you ever pay a dime. Think of it as a risk-free sandbox.
To keep your setup costs at $0, here’s what to do:
- Stick with a free theme. Shopify’s own free themes are clean, professional, and mobile-ready. They’re more than enough to get you started.
- Use free stock photos. High-quality images are non-negotiable. Use resources like Shopify Burst or Unsplash to find stunning product and lifestyle shots without spending anything.
- Go all-in on organic marketing. Start building your social media channels and email list from day one. It costs nothing but your time and effort.
This strategy lets you build a fully functioning, beautiful store before your first subscription payment is due.
How Much Does It Actually Cost to Run a Shopify Store?
Okay, so after the free trial, what's the real damage? Your main, unavoidable cost is the monthly Shopify plan, which is pretty reasonable for new businesses.
But there are a few other things to budget for:
- Premium Themes: This is a one-time purchase, usually falling somewhere between $180 and $350. A good theme is an investment in your brand's look and feel.
- Apps: Many of the must-have apps have great free plans. But as you grow, you might need paid features, which can add up with monthly subscriptions.
- Transaction Fees: If you opt out of using Shopify Payments, you’ll pay a small percentage of every sale to your chosen payment provider.
For a brand-new store, a realistic monthly budget after the initial setup could be anywhere from $50 to $150, depending on your plan and the apps you can't live without.
The single most overlooked cost? Your time. Building a brand and marketing your store is where the real investment lies. Budget your hours just as carefully as you budget your dollars—focus on the tasks that will actually move the needle.
Do I Need to Be a Designer or a Coder?
Nope. Not at all. And that's the beauty of Shopify. The entire platform was built from the ground up for entrepreneurs, not developers.
The drag-and-drop editor is incredibly intuitive. You can change colors, swap fonts, and add entire new sections to your homepage without ever looking at a line of code. Between the built-in tools and the massive Shopify App Store, you have everything you need to create a store that looks like it was built by a professional agency.
At ECORN, we turn great Shopify stores into unforgettable, high-converting brands. When you're ready to take your design and user experience to the next level, check out our expert services at https://www.ecorn.agency/.


Omnichannel Retail Strategy: A Shopify Playbook
Product Data Enrichment: A Guide for Shopify Brands
Instagram Shopping Features a Guide for Shopify Stores

What Is Revenue Optimization: A Holistic RevOps Guide
Benefits of Conversion Rate Optimization: Boost Your
WordPress to Shopify Migration: Your 2026 Seamless Switch
Boost Sales: Ecommerce Payment Processing Guide 2026
Unified Commerce Platform: Benefits, KPIs & Shopify Guide
How to Reduce Bounce Rate eCommerce: Your 2026 Guide
Shopify API Integration: A Practical End-to-End Guide

How to Implement Data Governance: A 2026 Guide
Shopify Store Development Cost: A 2026 Breakdown
What Is Server Side Tracking: The Shopify Guide 2026
Marketing Automation Workflows: A Shopify Guide for 2026

Shopify: How to Reduce Technical Debt

Shopify UX Design Change: A Playbook for Growth
User Generated Content Strategy: Shopify Playbook

Shopify Pause and Build Plan Cost: A Complete 2026 Guide
Compare at Price on Shopify: A Complete Guide for 2026
Where Can I Sell My Prints? 10 Best Platforms for 2026
Shopify Order Management System: The Ultimate Guide 2026
What Is Marketing Attribution? an eCommerce Guide for 2026
10 Best Black Friday Sales Sheets for 2026

Discover the Top Social Media Marketing Agencies For
Consumer Confidence Definition for eCommerce in 2026
What Is Social Commerce? Your 2026 Guide to Boosting Sales
A Social Ad Campaign Playbook for eCommerce Growth
7 Best FAQ Page Examples for SaaS & eCommerce

Market Research in Fashion Industry: A Guide for Shopify

Shopify Migration Services: Expert Guide for 2026
Mastering FB Retargeting Ads for Shopify in 2026
What Is Omnichannel Ecommerce

Master Your Shopify Plus Migration: The 2026 Guide
Shopify Integration Services: A Merchant's 2026 Guide
Shopify Collection Description: A Guide to SEO & Sales
Shopify Plus Contact: Reach Sales & Support Effectively

Top Luxury Shopify Stores: Design & UX Strategies
How to Improve Customer Experience: A Shopify Roadmap
Creative Facebook Ads: 10 Examples for Shopify Brands

Remarketing with Facebook Ads: A Shopify Guide for 2026

SEO Linking Strategies for Shopify Stores
Top 7 Statistics YouTube Channels for eCommerce in 2026

Hiring Shopify Plus Designers: A Founder's Guide

Shopify Product Variation: Master Your Variants for 2026

Leverage Ai Solutions Brands: Your 2026 Shopify Growth Guide
Filters in Shopify: A Guide for Growing Brands

Shopify Plus Developer: A Guide for Growing Brands

When Does Black Friday Online Start? A 2026 Guide
Black Friday Email Marketing: Shopify & Klaviyo Guide

Polaris Design System: The Complete Shopify Guide

How to Hire a Consultant Email Marketing Expert

What Is Q4? A Shopify Merchant's Guide to Peak Season

Marketing Organization Structure for eCommerce Growth

Top Account-Based Marketing Agency Guide for 2026

7 Remarketing Ad Examples for Your 2026 Campaigns

AI Retail Solutions: Boost Your Shopify Store

Migrate to Shopify: The Definitive 2026 Guide
Shopify Authentication App: A Guide for Secure Stores

Why Strategic Marketing Is Important for Growth in 2026

How to Create a Size Chart in Shopify: 2026 Guide

Shopify Themes for Jewelry: The Definitive 2026 Guide

Minimal Shopify Templates: Faster, Higher-Converting Stores
Maximize Profit: Shopify CC Fees 2026 Guide

Best Shopify Apps for Beginners in 2026

How to Improve Online Shopping Experience in 2026

Shopify Design and Development Services: A 2026 Guide

Small Business Social Media Marketing Agency: A Hiring Guide
Bulk Edit Shopify: A Guide to Save Hours on Store Updates

2026 Trends in Food and Beverage Industry

Post Purchase Survey Guide for Shopify Stores

How to Build an Ecommerce Brand in 2026
Conversion Rate Optimization for Ecommerce: Maximize Profit
How to Use Customer Data to Increase Sales: A Guide

Shopify for Enterprise: The 2026 Deep Dive Guide

Email Marketing Agencies: The Guide for Shopify Brands
Boost Sales With The Right Shipping Shopify App

Your Guide to the Shopify Site Map

7 Headless Commerce Examples for 2026

Mastering Trends in Cosmetic Industry for 2026
Transfer Shopify to BigCommerce The Complete 2026 Playbook

What Is Shopify Collective? Your 2026 Guide to Success

Unlock Shopify Growth with Site Link SEO

Integrating Shopify and WordPress A Complete Guide for 2026

Naming a Clothing Store: A Shopify Founder's Playbook

Guide to buying shopify store in 2026

Buying shopify store: Buying a Shopify Store: Invest Wisely

Food & Beverage Marketing: A Complete Guide for 2026
Facebook Ads Agency: A Shopify Brand's Hiring Guide

Shopify Apparel Stores: A 2026 Launch & Scale Guide
How to Deactivate Shopify Store: The 2026 Guide

Shopify and Square: The 2026 Ultimate Comparison

Your Guide to Beauty Products Ecommerce

A Guide to Marketing for Beauty Brands in 2026
Your Guide to Facebook Black Friday Ads
Facebook Ad Ecommerce for Shopify Growth

Iconography Web Design The Definitive Guide for Shopify Stores

A Modern Backlinks SEO Strategy for Shopify Stores
How to Launch an Online Store: A Step-by-Step Success Guide
Optimize Shopify Store: Master Performance in 2026

Successful Migration for Shopify: Protect SEO & Grow


newsletter in your inbox