

You've got a new theme sitting in your downloads folder, your current storefront's due a refresh, and the last thing you want is an upload error two minutes before you planned to preview it. That sequence is common, and it's usually avoidable. Treating a Shopify Theme ZIP as a versioned package, with a structure and size you check before you touch Shopify admin, turns installation into a short, predictable job instead of a troubleshooting session.
Where Your Theme ZIP Comes From
A theme package reaches you in three ways, and each one carries a different risk. Knowing which one you're holding tells you whether to upload it as received, export it first, or build it from a project.
Bought From the Shopify Theme Store
A paid theme bought from the Shopify Theme Store is delivered as a ZIP in your purchase account. Keep that original file untouched. Don't unzip it to look inside and then re-zip what you unpacked, because that manual step is where most structure errors start.
If you're still comparing options before you buy, work through how to choose a Shopify theme first, so you're uploading the right package once. Note that free themes from the Theme Store work differently. You add them from their store listing rather than uploading a ZIP, so the upload steps later apply to paid or downloaded packages.
Exported From an Existing Store
An export is the cleanest way to move a theme between stores or keep a backup you control. To download one:
- Open the theme library. Go to Online Store, then Themes.
- Find the theme you want. Open its Actions menu and choose Download theme file.
- Save the ZIP. Check the filename, which usually matches the theme name and version.
That export contains the theme code and its current settings. It doesn't contain your products, orders, or customer records, which stay in the store's database.
A ZIP exported from a live store carries that store's settings_data.json. Review it before you hand the file to a client or share it publicly, since it reflects how that storefront is configured.
Built Locally With Shopify CLI
A theme developed in a local project gets packaged with the shopify theme package command, run from the project root. That command is the safest way to build the archive, because it includes only the default theme folders, plus a listings folder for multi-preset themes, and names the file from values in settings_schema.json.
I would always prefer that command over right-clicking a folder and choosing compress. A manual archive happily scoops up whatever happens to sit in your working directory. The CLI command knows what a theme is and leaves the rest behind.
Check the Folder Layout Before You Zip
A theme ZIP isn't a general project archive you can organize however you like. Shopify expects a fixed layout, and it looks for specific folders in specific places when it unpacks your file.
The Minimum Shopify Accepts
The smallest uploadable package is a layout directory containing theme.liquid. According to Shopify's theme architecture documentation, that file must exist for a theme to be uploaded. A complete theme adds Liquid and JSON templates, reusable sections, snippets, configuration files, assets, and locale files on top of that minimum.
The split between file types matters for troubleshooting. Liquid generates the storefront's HTML, while JSON configuration files power merchant customization through the theme editor. JSON templates are what let you add, remove, and reorder sections without editing source code.
One rule catches people out. A JSON template only references sections, so it can't contain arbitrary HTML or Liquid directly. If you need custom markup on a page that uses a JSON template, that code belongs inside a referenced section. A Liquid template, by contrast, can hold Liquid and HTML in the template itself.
What Sits at the Root
| Folder or file | What it holds | Needed for upload |
|---|---|---|
| layout | theme.liquid and layout wrappers | Yes, theme.liquid must exist |
| templates | JSON and Liquid page templates | Needed for a full theme |
| sections | Reusable sections referenced by JSON templates | Needed when templates use sections |
| snippets | Small reusable code fragments | Optional |
| config | settings_schema.json and settings_data.json | Needed for the theme editor |
| assets | CSS, JavaScript and images | Optional, but usually present |
| locales | Translation files for each language | Optional for a single language |
Practical rule: Open the ZIP before uploading and confirm those folders sit at the top level. If the first thing you see is a single folder named after the theme, the package is nested one level too deep.
That nesting is the most common ZIP-specific failure. Shopify reads assets at the root, not my-theme/assets. Zip the contents of the theme folder, not the folder itself, and the package becomes readable.
Check Size and Structure Before Packaging
Compression forgives less than people assume. Squeezing a large project into a small ZIP doesn't get you past Shopify's checks, because the compressed package, the uncompressed code, and each individual file are all measured separately.
The Limits That Actually Apply
Shopify's theme limits documentation sets a maximum compressed uploaded theme package size of 50 MB, total non-asset code of 250 MB, and 100,000 files per theme. Per-file caps sit underneath those totals. JSON templates and section groups are capped at 512 KB, settings_schema.json at 512 KB, settings_data.json and locale files at 1.5 MB, and other Liquid files such as sections, snippets, and layouts at 256 KB.
| Limit | Maximum |
|---|---|
| Compressed upload package | 50 MB |
| Total code outside assets | 250 MB |
| Files per theme | 100,000 |
| JSON templates per theme | 1,000 |
| Sections per JSON template | 25 |
| Blocks per section | 50 |
| Theme-block files | 300 |
| Theme-block nesting | 8 levels, excluding the section level |
| JSON templates and section groups | 512 KB each |
| settings_schema.json | 512 KB |
| settings_data.json and locale files | 1.5 MB each |
| Sections, snippets and layouts | 256 KB each |
Architecture limits shape how you build, not just how you package. A theme can contain up to 1,000 JSON templates, each JSON template can render up to 25 sections, and each section can contain up to 50 blocks. Highly configurable page builders push against the block and nesting caps first, so reusable sections beat duplicated page-specific code every time.
A Release Workflow That Catches Problems Early
Run these checks on the local package, in this order, before the ZIP reaches any store:
- Start clean. Export or build from a clean repository, not a working folder with leftover files.
- Check the root. Confirm assets, config, layout, locales, sections, snippets, and templates sit at the ZIP root.
- Strip development artifacts. Remove Git metadata, dependency directories, source maps, and local configuration.
- Run Theme Check. Fix every error it reports before you package anything.
- Measure both sizes. Check compressed and uncompressed totals, then split oversized files or monolithic sections into snippets or reusable sections.
- Package with the CLI. Build the archive with shopify theme package so only recognized folders go in.
That sequence follows the packaging process in Shopify CLI's theme package documentation, which includes only folders matching the default theme structure. Theme Check is a linter for Liquid and JSON that flags errors and deviations from theme best practices. Treat it as a pre-upload gate, not a substitute for storefront QA.
There's no published success rate for ZIP uploads to benchmark against, so use a process benchmark instead. Require a clean Theme Check result, a completed draft import, and passing regression checks on home, product, collection, cart, search, mobile, and localization before you call a package ready. Exceeding a limit produces an error when a theme is saved, uploaded, or synchronized, so catching it in step five saves you an embarrassing failure during client handoff.
If your package needs more than packaging help, that's a development question. Our Shopify development covers everything from minor theme adjustments to comprehensive custom theme development, built on Shopify, React, Node and Liquid.
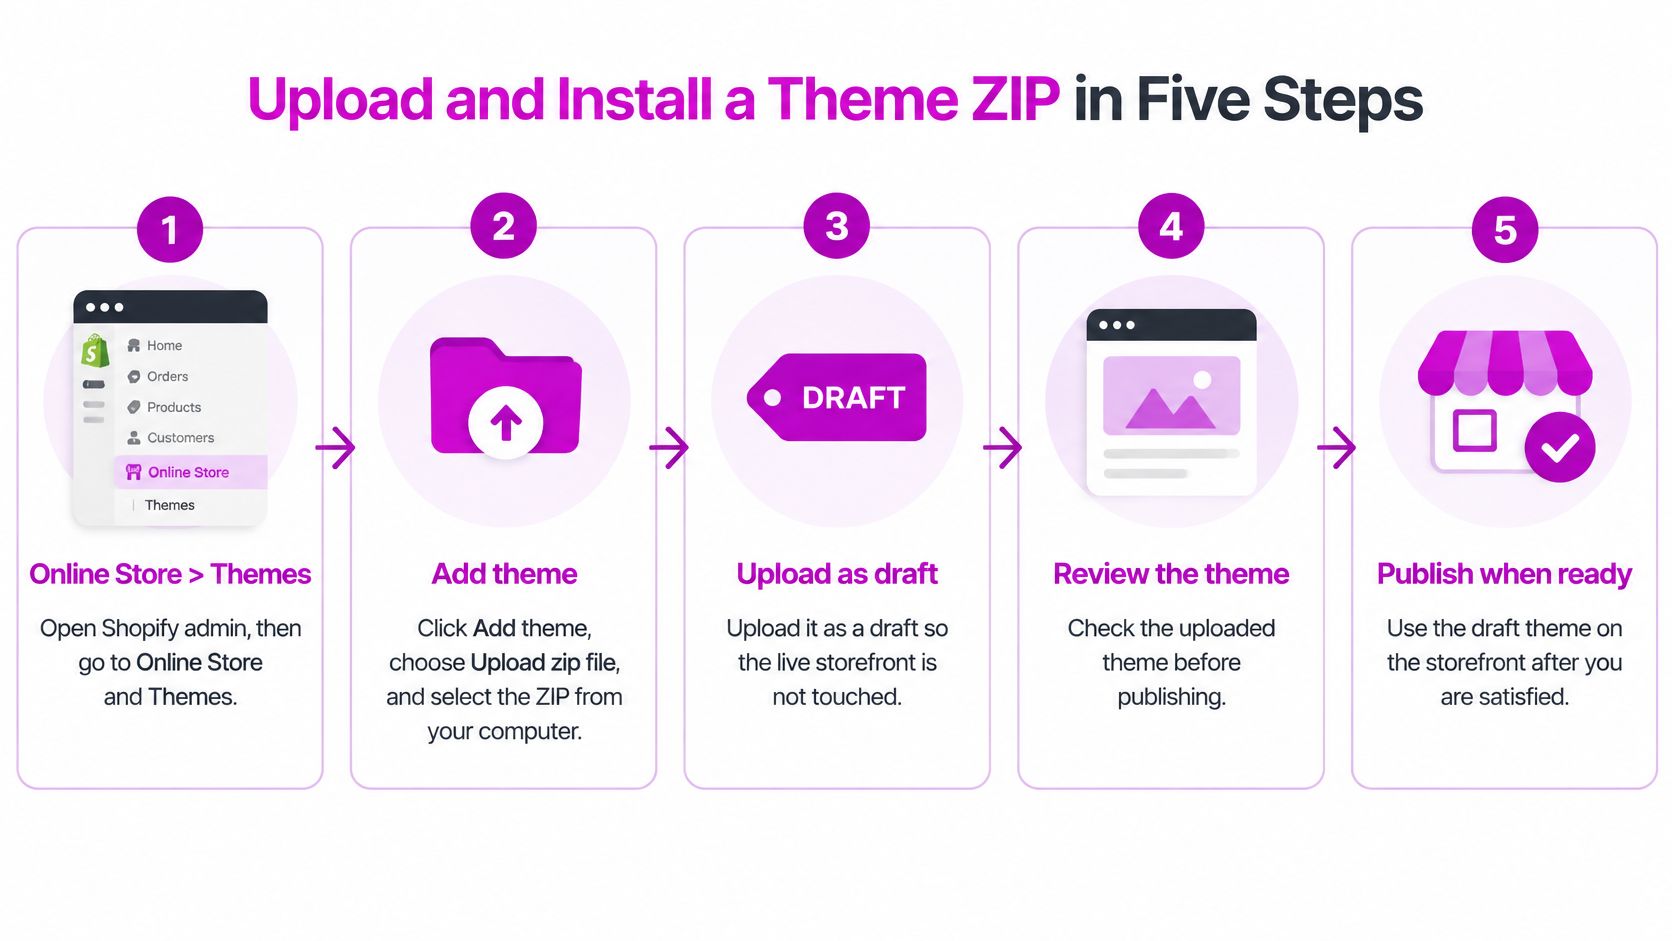
Upload and Install a Theme ZIP in Five Steps
Uploading is the short part of this job, provided the package has already passed its checks. The five steps below move a validated ZIP into your theme library without touching your live storefront until you're ready.
The Upload Path
- Go to your themes. In Shopify admin, open Online Store, then Themes.
- Add the file. Click Add theme, choose Upload zip file, and select the ZIP from your computer. It uploads as a draft, so your live storefront isn't touched.
- Wait for the import to finish. Shopify unpacks the files and the theme appears in your theme library with a Preview button.
- Preview before you change anything. Check the home page, one product, one collection, the cart, and search results on desktop and on a phone.
- Customize, then publish. Open Customize to set colours, fonts, and sections. Once the preview's clean, choose Publish from the theme's Actions menu.
If the import stops at step three, don't keep retrying the same file. Compare the package against the packaging checks, fix what's wrong, and upload the corrected version as a fresh draft.
The short video below walks through the same admin path, which is worth watching once if you've never used the Add theme menu.
Go Live With a Way Back
Publishing swaps the live theme immediately. Keep your previous theme in the library rather than deleting it, so you've got a rollback point if a customer-facing problem shows up after launch.
Your products, orders, and customer data aren't part of the theme, so they stay exactly where they are through the switch. What doesn't carry over is custom code added directly to your old theme's files. If you patched the outgoing theme, port those changes deliberately instead of assuming they'll travel.
The discipline is simple. Upload as a draft, preview, then publish. Skipping the middle step is how a broken header ends up in front of paying customers.
Fix Upload Errors and Failed Imports
Most failed imports come down to the package, not the store. Work through the symptoms in order, starting with the one that accounts for the majority of rejections.
Start With the Nested Folder
The most common failure is a ZIP with the whole theme wrapped in one extra folder. Shopify opens the archive, doesn't find theme folders where it expects them, and can't read the package as a theme at all. That fix takes minutes. Unzip the file, step inside the theme folder, select its contents, and zip those instead.
The remaining failures break down by symptom:
| Symptom | Likely cause | Fix |
|---|---|---|
| Upload rejected or layout error | theme.liquid missing from layout | Add layout/theme.liquid at the root and rebuild the ZIP |
| Files appear nested under a folder | ZIP wraps the theme in a parent folder such as my-theme/ | Zip the contents of the folder so assets sits at the root |
| ZIP larger than 50 MB | Source maps, Git data or node_modules included | Remove development artifacts and repackage |
| Import stops on a settings or Liquid file | settings_data.json or a section above 512 KB or 256 KB | Split the file and re-check the size limits |
| Theme imports but pages render broken | Theme Check errors or missing templates | Run Theme Check, fix the errors and preview again |
| Editor shows a missing section | JSON template references a section absent from the ZIP | Include the section file or remove the reference |
Separate Quick Fixes From Refactors
Some of these are packaging corrections you'll finish before your coffee cools. Removing node_modules, Git data, and source maps, then rebuilding the archive, resolves an oversized ZIP without touching theme code. Adding a missing section file is equally quick, provided the file exists somewhere in your project.
Others take longer and you should plan for that. Splitting a bloated settings_data.json or breaking a monolithic section into reusable sections means editing code while preserving schema compatibility, so merchant settings don't reset. A theme that imports but renders broken pages needs Theme Check errors fixed one by one, with a preview after each batch to confirm what's resolved.
Re-upload as a new draft after every fix rather than overwriting the one that failed. Two drafts side by side let you compare results instead of guessing whether the change helped.
That comparison habit is the check that proves a fix worked. The new draft should import completely, preview cleanly across your core templates, and open in the editor with no missing sections. If you're maintaining themes across releases rather than doing a one-off install, our guide to updating a Shopify theme covers how to keep customizations intact when a newer package replaces the old one.
If your theme package keeps failing checks, or you need a custom theme built and packaged so it uploads cleanly the first time, we can handle the development and release process for you. Our team builds and customizes Shopify themes with the structure, limits, and QA gates above baked into every handoff. Visit ECORN to talk through your theme project and get it live without the upload drama.


Shopify Plus Organization Admin: Roles and Access Guide
How to Build a Drop Down Menu in Shopify: Steps and Fixes
Shopify Plus Integration Services Guide
Shopify Customer Experience: A 2026 Guide

Shopify Plus Expansion Stores: Limits and Setup
Shopify Theme Update: Safe Steps, Backups and Rollback

Shopify Website Design Packages: What You Actually Get

How to Choose a Shopify Plus Web Design Agency in 2026
Shopify Plus Ecommerce Agency: How to Pick the Right One
Shopify Themes Retina: How to Serve 2x Images

How to Cross Sell on Shopify Without Friction

Best Shopify Theme for Custom Products Compared
Multi Store Inventory Management: A Practical Guide

SEO Consulting for Ecommerce: A Practical Guide
Shopify Theme Updater App: A Safe Update Playbook
Shopify Git Integration: A Developer's Guide to 2026
Headless Ecommerce Development Services Explained

How to Build a Shopify Clothing Website That Converts

How to Launch a Box Subscription Business in 2026

Luxury Skincare Branding Playbook That Converters

10 Best Podcast Ecommerce Shows for Store Growth in 2026
Shopify Developer Hourly Rate: What to Pay in 2026
Critical Shopify Setup Errors That Are Secretly Sabotaging Your Store
Ecommerce Conversion Tracking: The Complete How-To Guide

Shopify Design Agency: How to Pick the Right Partner
Mastering Multi Store Management on Shopify

Scale Shopify Store

10 Shopify App Ideas Worth Building in 2026
Conversion Rate Optimization for Landing Pages: The Playbook
Shopify Plus Automation: A Guide for 2026
10 Social Selling Platforms for Shopify Merchants

Shopify Website Design Examples: 7 Stores Worth Studying

7 Ecommerce Newsletter Examples for Shopify Brands
One Product Shopify Store: Build and Scale

Mobile Pop Up Strategy for Shopify Stores That Converts

Sitemap for Shopify: How to Find, Optimize, and Submit It
7 Single Product Websites Worth Emulating
Product Variants Shopify: The Complete 2026 Guide

Ecommerce Analytics Consulting for Growth

What Is AI Integration for eCommerce

How to Choose the Right eCommerce Website Development Firm

E Business Strategy Implementation
Conversion Tracking Setup for Shopify Stores

BigCommerce vs Shopify Plus Which Enterprise Wins in 2026
Shopify Theme Kit: Setup, Commands, and Migration Guide
Shopify Extension Development: A Practical 2026 Guide

Shopify Speed Score Explained and How to Improve It
Shopify Mobile Optimization: The 2026 Playbook
How to Add Subcategory in Shopify for Better UX
How to Implement Structured Data for Ecommerce in 2026

SEO App Mobile: Shopify Store Optimization Guide
Shopify Plus Support: What It Includes and How to Choose

Google Ads for Shopify: The Complete 2026 Playbook

Shopify New York: How to Find and Hire the Right Agency

Google Search Console for Shopify: The Complete Setup

First Party Data Collection for eCommerce Growth
FAQ Online Store Guide: Build and Measure It Right

Do FB Ads Work for eCommerce in 2026?
One Page Checkout for Shopify: Design and Implementation
Shopify GraphQL vs REST: The 2026 Developer Decision
Shopify Ecommerce Consulting: Strategy, Pricing &

Are Reddit Ads Worth It for eCommerce Brands
Shopify Title and Meta Description: A Practical 2026 Guide

Product Video Best Practices for Shopify Brands
Real-Time Inventory Management: A 2026 Guide

AI Chatbot Integration for Shopify Stores
Affiliate Program Management: A Shopify Guide
10 Best Performance Monitoring Tools for Shopify in 2026

Digital Asset Management for eCommerce Brands in 2026

Every Type of Facebook Ads Explained for eCommerce Growth
Product Information Management Explained for Shopify Brands
Support Ticket System: A Guide for Shopify Stores

10 Best Customer Service Tools for Shopify in 2026

Can I Start a Business with No Money? a 2026 Blueprint

What Sells Good on Etsy: Best Niches for 2026

Shopify Add to Cart Button: A Practical 2026 Guide

Customer Feedback Automation: A Practical eCommerce Guide
Critical Rendering Path: A Guide for Shopify Stores

How to Promote on TikTok for eCommerce in 2026

B2B eCommerce Consulting That Drives Real Revenue

10 Best Practices for Site Navigation in 2026
Return vs Refund for Shopify Stores: A Practical Guide

What Is Customer Lifetime Value and Why It Matters

What Is Voice of Customer Research for eCommerce

SMS Marketing for Ecommerce That Actually Converts

Master How to Improve Email Deliverability in 2026

Top 8 eCommerce Partners NYC for Shopify Brands in 2026

Machine Learning for Ecommerce: Boost Your Shopify Store

Beauty Market Research: Your 2026 Growth Guide

Shopify International Expansion: A 2026 Roadmap

What Does CRO Stand for in Business: Understanding CRO

Shopify Visual Merchandising: A Playbook for Higher Sales

Shopify Landing Page Design: Master Conversion in 2026

10 Best AI SEO Optimization Tools for Shopify in 2026

Agentic AI for Ecommerce: Boost Your Sales in 2026
Mastering Email Marketing Data for eCommerce Growth

Conversion Rate Optimisation Australia: Boost Your Sales
Conversion Rate Optimization AI: Your Shopify Store Guide

10 Product Bundling Strategies for Shopify in 2026

How to Increase Customer Lifetime Value: A Shopify Playbook


newsletter in your inbox